

Before Your First Hand-Dyeing Session
Plan a first cotton swatch, choose what to do yourself, and find out whether you’ll need to finish the dyeing at home.
By BeenEast Editorial · Published · Reviewed
Choose what you want to do yourself
Start with one white cotton swatch, one dye method, and one thing you want to see. To learn how a pale ring forms, gather and bind the cloth yourself, then see where the ring falls when you open it. To learn how an indigo vat works, choose a session that teaches you how to prepare and check the vat under supervision.
A prepared indigo vat lets you practice dipping the cloth and watch it turn blue in the air. Preparing the vat yourself adds a separate skill: getting the indigo into a form that can dye cloth and recognizing when the vat is ready to use.
Sources: Museum of Fine Arts, Boston — Shibori
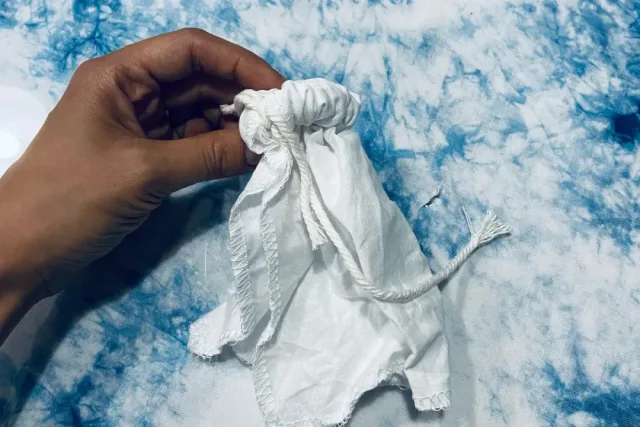
In the photo, a cord squeezes the white cloth into a tight neck. That pressure limits how much dye reaches the cloth under the cord. When the cloth opens, the compressed area can show up as a pale ring against the dyed fabric.
Sources: Museum of Fine Arts, Boston — Shibori
Match the cloth to the dye
For a first swatch, choose the workshop’s supplied cotton or a lightweight piece labeled 100% cotton that the instructor or product directions confirm is suitable. Ask whether it comes prewashed. Oils and fabric finishes can interfere with dye uptake, so follow the method’s preparation directions before you tie the cloth.
Sources: Dharma Trading — Fiber-reactive tie-dye instructions
If you bring a garment, check the fiber label and show the instructor any stitching, elastic, or trim you want to dye. A cotton body with polyester stitching may leave the stitching visibly lighter in a fiber-reactive process for cotton. A plain swatch makes it easier to connect a pale mark to the place you tied.
Sources: Dharma Trading — Fiber-reactive tie-dye instructions
Set up for wet work
Plan where you will tie the dry cloth, where a dripping swatch will go when it leaves the dye, and where you will rinse it. The MFA’s indigo activity uses a protected work surface, ventilation, gloves, and containers and tools set aside for dyeing. Set out a protected tray before lifting the cloth so you have somewhere to put it immediately.
Sources: Museum of Fine Arts, Boston — Shibori
If your session includes measuring dry dye or other ingredients, read the product labels and check the protective equipment with the instructor before mixing. At home, set up the protection, ventilation, and cleanup specified for your product before you open it.
Find out what happens after dyeing
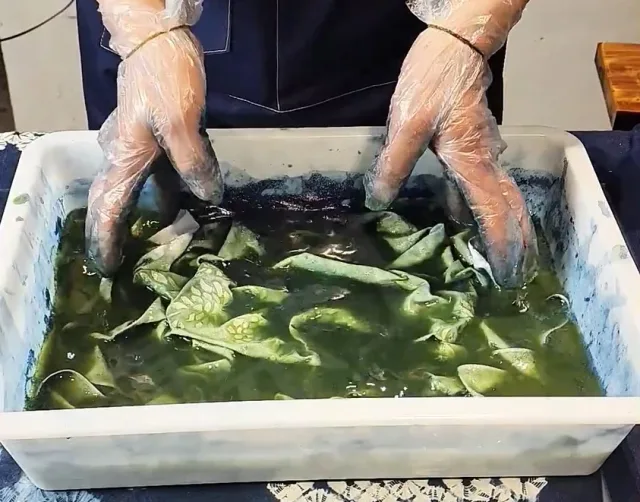
With the MFA’s indigo method, the cloth comes out of the vat greenish and turns blue as the dye reacts with oxygen in the air. The method then calls for rinsing and drying. Seeing the blue develop is one stage. The dry, finished swatch is the one to use when judging the final shade.
Sources: Museum of Fine Arts, Boston — Shibori
Dharma’s fiber-reactive tie-dye method calls for a damp rest before rinsing and washing out excess dye. During that rest, the dye can bond with the cotton. Ask whether the studio handles the washout or sends the swatch home still tied. If it goes home unfinished, ask for a transport container and written directions for how long to keep it damp, when to untie it, and how to wash it.
Sources: Dharma Trading — Fiber-reactive tie-dye instructions
Before booking, you can ask the studio. “For the [workshop name], will I tie and dye my own cotton swatch? Is the indigo vat already prepared? Will I take home a washed swatch, or finish it at home?” The answers tell you which skills you’ll practice and whether you need a rinse area at home.
Compare the tie with the finished mark
If the studio allows photos, take one of the tied swatch before dyeing. Record the fabric, the dye product or studio method, and which finishing steps are still due.

After the required wash and drying, lay the swatch flat next to the photo. Match the cord’s position to the pale mark and compare it with the cloth just outside it. For a second swatch, keep the fabric and dye method the same and change just the position of the tie. The two finished swatches show how moving the tie moves the mark.
Continue reading
Reuse and citation
English PDF and Markdown contain the text; their photo links open the illustrated guide.
BeenEast Editorial. Before Your First Hand-Dyeing Session. Version 1.0 (2026-11-13). https://community.beeneast.com/guides/hand-dyeing-session
These two dye methods illustrate different finishing sequences. Use the directions for the dye and fabric you actually work with.