

How to Get a Darker Blue with Indigo Dips
Compare one, two, and three indigo dips on matching cotton swatches, then choose a dip count from the washed, dry results.
By BeenEast Editorial · Published · Reviewed
Build the blue one dip at a time
To build a deeper indigo blue on cotton, dip the cloth, let both sides oxidize in the air, then repeat. To choose a dip count for your fabric and dye bath, stop three matching swatches after one, two, and three cycles and compare them after washing and drying.
Sources: Jacquard — Indigo Tie Dye Kit Quick Start · Brooklyn Botanic Garden — DIY Shibori with Indigo
In the vat, indigo is in a form that can dissolve in water. As the cloth meets air, oxygen changes the dye back into its insoluble blue form. Count one dip and its air exposure as one cycle. The blue you see at this point is still on wet cloth.
Prepare three pieces from the same cotton
Cut three equal pieces from the same cotton you plan to use. Prepare them together, following your dye instructions, and leave them flat and unbound. A tight fold can limit where dye reaches the cloth and make one swatch look paler even at the same dip count.
Sources: Brooklyn Botanic Garden — DIY Shibori with Indigo
Set out three numbered spots on a tray for the wet cloth. Use the same prepared vat for all three. Keep the time per dip and the air exposure per round consistent, using the instructions for your kit or vat.
Stop one swatch after each round
Dip all three swatches in the first round. Once they have had the full air exposure specified for your vat, retire swatch 1. Dip swatches 2 and 3 again, let both oxidize, and retire swatch 2. Give swatch 3 one final dip and air exposure.
Sources: Jacquard — Indigo Tie Dye Kit Quick Start
Lift the swatch slowly from the vat at A. At B, open it out and turn it so both faces meet the air; separate any parts that are folded against each other. Wear the gloves specified by your dye instructions. The two cloth shapes at B show opposite faces of the same swatch, not two different samples.
Sources: Jacquard — Indigo Tie Dye Kit Quick Start
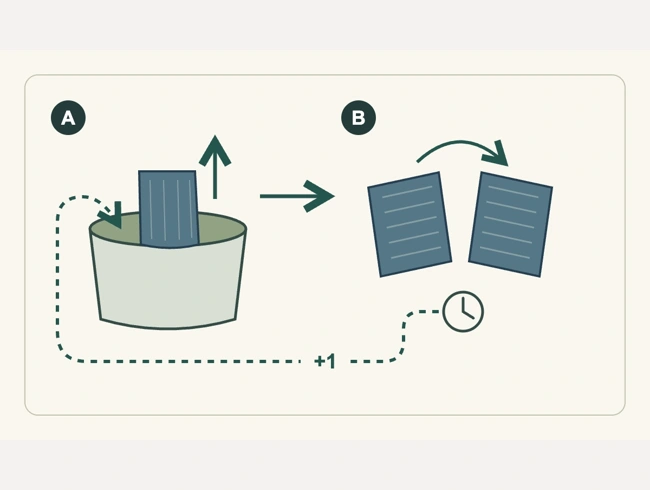
Give the swatch the full air exposure called for in your vat instructions, even if the cloth turns blue sooner. Jacquard’s quick start specifies 20 minutes for its kit. Follow the timing for your own vat.
Sources: Jacquard — Indigo Tie Dye Kit Quick Start
After oxidation, follow the dashed +1 arrow back into the vat if the swatch still needs another round. When it reaches its assigned count, move on to rinsing, washing, and drying. Finish all three the same way and keep their numbers with them.
Sources: Jacquard — Indigo Tie Dye Kit Quick Start
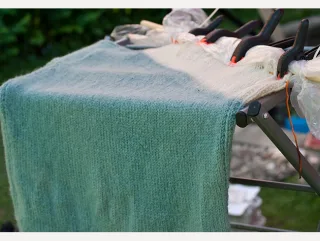
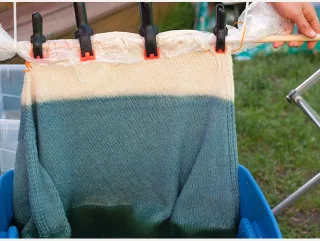
The next three photographs follow one wool sweater in Elizabeth and Debbie Sullivan’s tutorial. They show the first dip, the following air exposure, and removal after the second dip. This is a separate demonstration of the cycle, not the cotton test above; its timing and shades do not transfer to cotton.
Sources: Elizabeth and Debbie Sullivan — Indigo Dip Dye Tutorial (photos: Debbie Sullivan)

The first air exposure makes the change visible across the cloth. Keep the distinction between oxidation and drying: the fabric in this photograph is wet.
Sources: Elizabeth and Debbie Sullivan — Indigo Dip Dye Tutorial (photos: Debbie Sullivan)
On the second lift, the dyed area already carries blue from the earlier cycle. A later dip need not look as green as the first one.
Sources: Elizabeth and Debbie Sullivan — Indigo Dip Dye Tutorial (photos: Debbie Sullivan)
Compare the dry cloth under one light
Lay the three dry swatches flat on the same background with their numbers visible. Compare the centers in the same light. If one looks patchy, check several areas before ranking it. Photograph all three together so you have a record of the shades under one set of lighting conditions.
The numbered comparison below is an independent cotton experiment by Lai and Chang, photographed after the recorded washing and drying procedure. Numbers 1–9 identify one to nine cycles.
Sources: Lai and Chang — Indigo Dyeing Experiment, Figure 2 (CC BY 4.0)
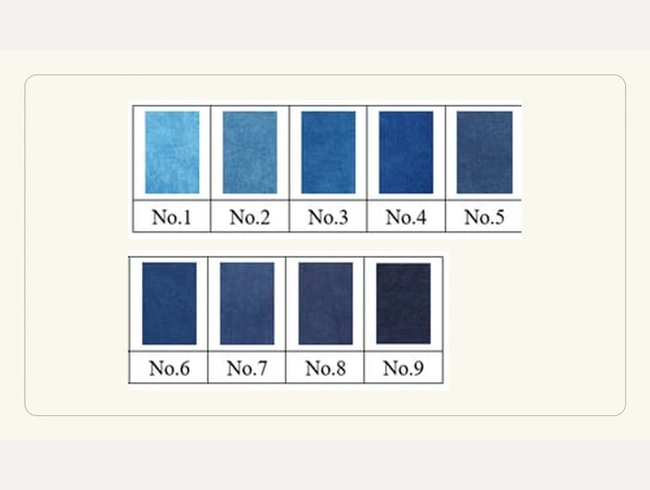
In Lai and Chang’s cotton series, the first few samples show a clearer change in shade than several neighbors at the dark end. To see what one more round does in your own vat, keep the time per dip and per air exposure the same for all swatches.
Sources: Lai and Chang — Indigo Dyeing Experiment, Figure 2 (CC BY 4.0) · Creative Commons Attribution 4.0
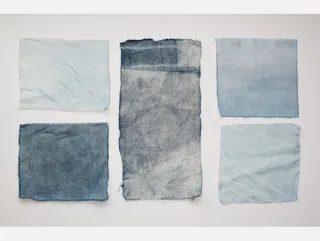
A separate workshop record by Sophia Naureen Ahmad shows the cloth after it was fully dried and ironed. The range of pale and darker pieces is easy to see, but this set mixes cotton and silk, and the dip counts are approximate. It shows why finished samples are useful records; it cannot establish a one-dip color increment.
Sources: Sophia Naureen Ahmad — Inside Indigo: dried workshop samples
Record a starting point for the next piece
If two and three dips look equally close to your target, start with two on a fresh scrap. If three dips are still too light and each round made a visible difference, test a fourth cycle on another scrap.
If the two- and three-dip swatches are both too light and look nearly the same, pause before adding another dip. First, confirm both were washed the same way and are fully dry. Compare the same area of each under the same light.
Next, check the swatch labels and your notes. Confirm each swatch got the planned number of dips, the same time per dip, and the full air exposure on both sides after every dip.
Finally, check whether the vat is ready to use according to the instructions for your dye method. Once the vat is ready and the timing is consistent, repeat the two- and three-dip comparison on fresh scraps of the same cotton before dyeing the full piece.
Sources: Jacquard — Indigo Tie Dye Kit Quick Start
Keep the chosen swatch with the fabric, vat, dip count, time per dip and per air exposure, and finishing method. A vat can yield different shades over time. Catharine Ellis recorded a similar blue from two dips in May and five dips in the same vat the following February. Retest when you change the fabric, vat, or fold.
Continue reading
Reuse and citation
English PDF and Markdown contain the text; their photo links open the illustrated guide.
BeenEast Editorial. How to Get a Darker Blue with Indigo Dips. Version 1.0 (2026-11-13). https://community.beeneast.com/guides/indigo-dye-repeat-dips
The cotton exercise, Sullivan’s wool demonstration, Lai and Chang’s numbered cotton experiment, and Ahmad’s dried samples are separate examples. Photographs retain their original colors.
References
Jacquard — Indigo Tie Dye Kit Quick Start
Brooklyn Botanic Garden — DIY Shibori with Indigo
Lai and Chang — Indigo Dyeing Experiment, Figure 2 (CC BY 4.0)
Creative Commons Attribution 4.0
Catharine Ellis — The Life of an Indigo Vat
Elizabeth and Debbie Sullivan — Indigo Dip Dye Tutorial (photos: Debbie Sullivan)
Sophia Naureen Ahmad — Inside Indigo: dried workshop samples