

How to Read a Paper Cut: A Butterfly in Three Views
A butterfly’s outline, wing openings, and narrow strips of paper show how a cut design takes shape and stays connected.
By BeenEast Editorial · Published · Reviewed
The outline gives the butterfly its shape
A paper cut is shaped by both the paper that remains and the spaces cut through it. The outer edge gives this butterfly its wings and antennae. Inside that outline, round holes, long openings, and fine pointed cuts make the wing pattern. The strips between those openings keep the pattern connected.
In the finished piece below, the upper wings taper to points, while the lower wings have rounded edges. The two long antennae and the narrow body make the butterfly recognizable before you study its decoration. Its outline does much of the work; the smaller cuts add detail without changing the overall shape.
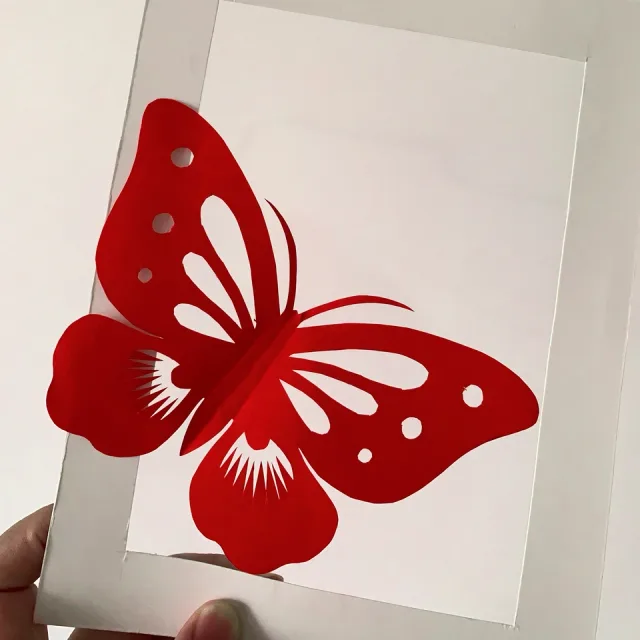
These photographs come from one demonstration that uses two sheets to compare a plain silhouette with a decorated version. The folded views below make the difference easier to see. They are examples for looking at the design, rather than a complete cutting tutorial.
Openings add detail inside the outline
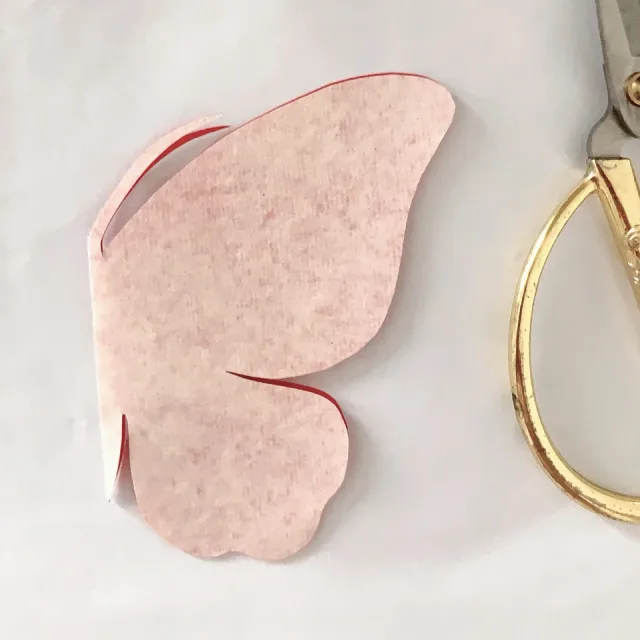
This plain version has its outer shape cut, but its wings are still solid. Shown folded, it has one upper wing, one lower wing, and an antenna; the matching half lies underneath. The pale face of the paper is toward the camera, with red visible along the edge.
The finished version keeps that recognizable outline and opens up the broad areas inside it. Three round holes punctuate each upper wing, while three longer openings fan out from near the body. Their wider ends face the wing tip and their narrow ends converge toward the center. This arrangement gives the wing a direction that the plain silhouette does not have.
The light shapes are openings through the paper. Here they reveal the pale backing; against a dark backing, the same openings would look dark. Identifying which parts are paper and which parts are empty is more useful than treating every pale shape as a white decoration.
The paper between the cuts matters too
The decorated version below shows what remains between the openings. In the upper wing, slender strips separate the three long holes and meet the wider paper around them. The holes stop short of the outside edge, leaving a continuous border. Together, the narrow strips and that border keep the open pattern part of the wing.
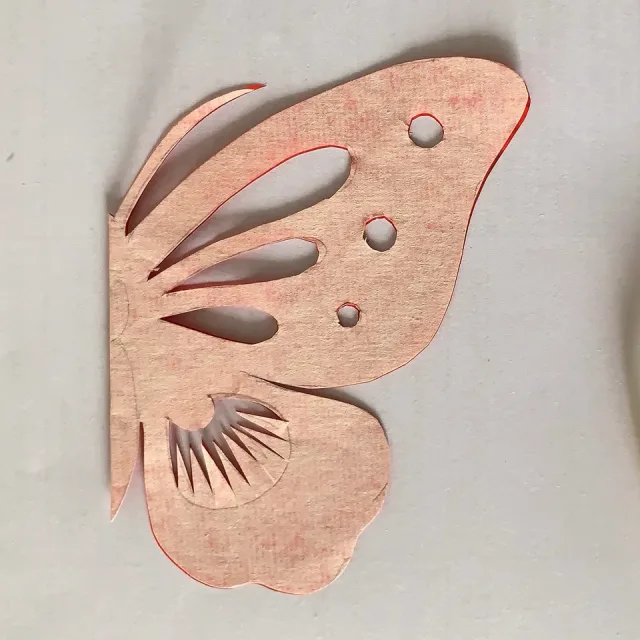
The lower wing uses a different scale of detail. Small tapered openings sit close together, leaving a fringe of pointed paper between them. Broad, solid areas make the wing easy to recognize; these finer cuts make its surface feel lighter. More cutting is not automatically better: the effect comes from the relationship between solid paper, open space, and the width of the connections.
A narrow connection between parts of a design is often described as a paper bridge. It must remain attached at both ends to serve that role. The antenna offers a useful contrast: it is attached at the head but free at its tip, so its job is to form an outline, not to join two areas. If the only connection to a detail is cut through, that detail becomes a separate piece.
Chinese paper cutting also distinguishes lines made from retained paper (yangke) from lines made by cutting paper away (yinke). You can understand the difference here without assigning the whole butterfly to one category: a paper strip and the opening beside it work together to make the pattern.
The butterfly’s character comes from this balance: a clear outline, a few broad openings, and finer cuts where a softer texture is wanted.
Written by BeenEast Editorial. The references below explain general paper-cutting concepts.
References
China Intangible Cultural Heritage Network · Paper-cutting art
Shaanxi Intangible Cultural Heritage Digital Museum · Chinese Paper Cutting