

Carve Clean Lines and Refine Your Woodblock
Support delicate raised lines, remove unwanted printing marks, and compare new proofs from the same woodblock.
By BeenEast Editorial · Published · Reviewed
Keep wood beneath the line
A fine dark line in a woodcut is a narrow strip of wood that stays high enough to carry ink. Preserve its top and the wood beneath it, clear the surrounding waste in small cuts, and use a fresh proof to decide whether further trimming is needed. Cutting deeper beside every weak-looking line can remove its support without improving the print.
Sources: Letterpress Commons · Carving the woodblock
This guide follows one mountain block from artist Meredith Nemirov’s Lone Cone project: an initial paper proof, carving after that proof, and a second proof from the revised block. The photographed correction clears marks in the sky next to the mountain. We use it to follow a real revision; the small practice exercise and diagrams below explain how to protect a delicate line on your own block.
Sources: Meredith Nemirov · Lone Cone: first proofs, recarving, and second proof
A raised line and a carved white line require opposite decisions. To print a dark contour, remove wood beside it. To make a white channel through a dark field, remove the channel itself. Before touching a crowded detail, mark the part that must remain on a spare drawing. A V-gouge can cut a white groove, but running it down the center of a line intended to print black destroys that line.
Sources: McClain’s · Woodblock tools and their uses
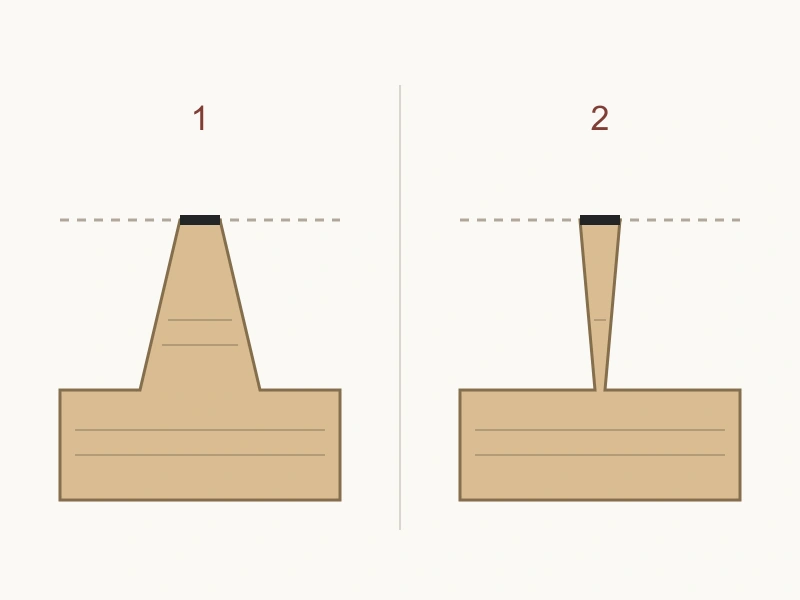
The cross-section explains why a slightly sloping side is useful: the printing top can be fine while the base remains wider. An undercut removes wood beneath the edge and leaves it vulnerable to breaking. The drawing is deliberately enlarged; it gives neither a universal minimum line width nor an angle to copy. Grain, wood condition, tool geometry, and your control all affect what survives.
Sources: Walter J. Phillips · The Technique of the Color Wood-Cut: Cutting
Plan a cut you can stop
Use an offcut of the same board to try one short straight line and one curve before refining your image. Include a part that runs with the grain and one that crosses it. Keep the intended raised strip broad at first. This is a suggested practice, not a test documented in the Lone Cone photographs. A successful trial leaves an unbroken edge after the waste is removed, without loose fibers lifting from its base.
Sources: Letterpress Commons · Carving the woodblock · Walter J. Phillips · The Technique of the Color Wood-Cut: Cutting
Brace the block against a bench hook or suitable stop, keeping the supporting hand out of the tool’s forward path. Rotate a small block to reach the next short segment instead of twisting your wrist into a strained position. If the board moves, the tool skips, or the cut takes increasing force, stop and check the setup and cutting edge on the offcut. A line that is already lifting needs inspection, not another harder push.
Sources: Art Prof · Woodcut: proofing and ink · Walter J. Phillips · The Technique of the Color Wood-Cut: Cutting
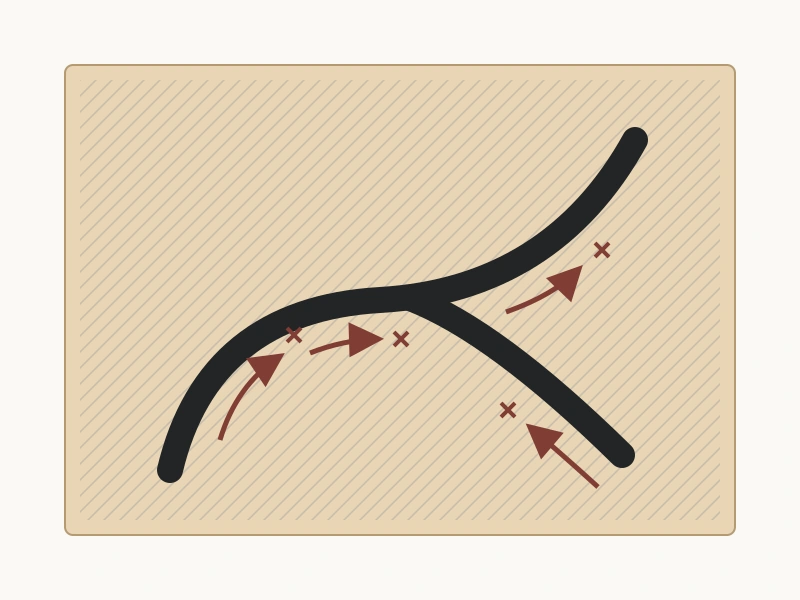
At a corner or crossing, decide where this pass must end before it begins. Make the boundary cuts separately; stop short of the meeting point and finish the small remainder with a controlled cut from a better position. Do not drive a long gouge stroke straight into a neighboring line. The waste should leave along cuts you have made, rather than tear out a strip that is still attached to the image.
Sources: Mokuhanga Fundamentals · Carving, sample pages 47–48
Separate the edge before clearing
For a knife-cut outline, make the first cut beside the shape that must stay. The cut should slope away from the retained top into the waste. A second cut from the waste side meets it to release a small sliver. If the sliver remains attached, lift the tool and complete the cuts; levering it sideways can pull on the line you meant to protect. Confirm the blade orientation for your particular knife and handedness with its instructions or a teacher.
Sources: Mokuhanga Fundamentals · Carving, sample pages 47–48
Once the boundary is separated, use a gouge that fits the open space to lower the waste in shallow passes. A broader tool is useful in a broad field; it does not belong in a gap narrower than its cutting edge. Leave the fine edge for a smaller, controlled pass. Chisels or flatter clearing tools can remove peaks left between gouge tracks. Their purpose is to lower unwanted printing high spots, not to shave the top of the retained line.
Sources: McClain’s · Woodblock tools and their uses
Enough depth means the cleared area stays off the paper under your intended printing conditions. It does not mean every hollow must reach the same deep floor. Keep the area near a fine line conservative and verify it in a proof. Before inking, remove loose chips with a brush and check that no splinter is standing where it could catch the roller or paper.
Match the paper mark to the block
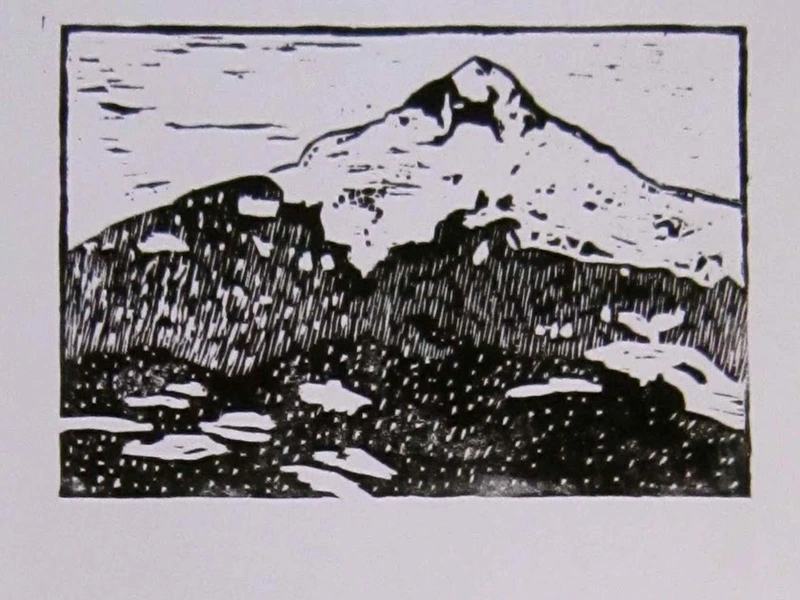
In the first Lone Cone proof, horizontal black marks sit in the sky to the left of the peak. The ridge itself is a continuous dark outline worth retaining. Because the paper and block are reversed, that left-hand sky corresponds to the right-hand sky when the block is held upright with the peak at the top. Identify both the unwanted mark and the neighboring line before planning a cut.
Sources: Meredith Nemirov · Lone Cone: first proofs, recarving, and second proof
For your own proof, first rule out a thick ink film filling the channels. Clean the block as directed for your ink, let it return to a suitable carving condition, and check for debris. If a lighter, even inking still gives the same unwanted mark, inspect its matching spot under light from the side. A raised ridge in an intended white area is a candidate for trimming. A faint or missing intended black line may instead need better ink transfer; if its wood is missing, more cutting cannot put it back.
Sources: Art Prof · Woodcut: proofing and ink
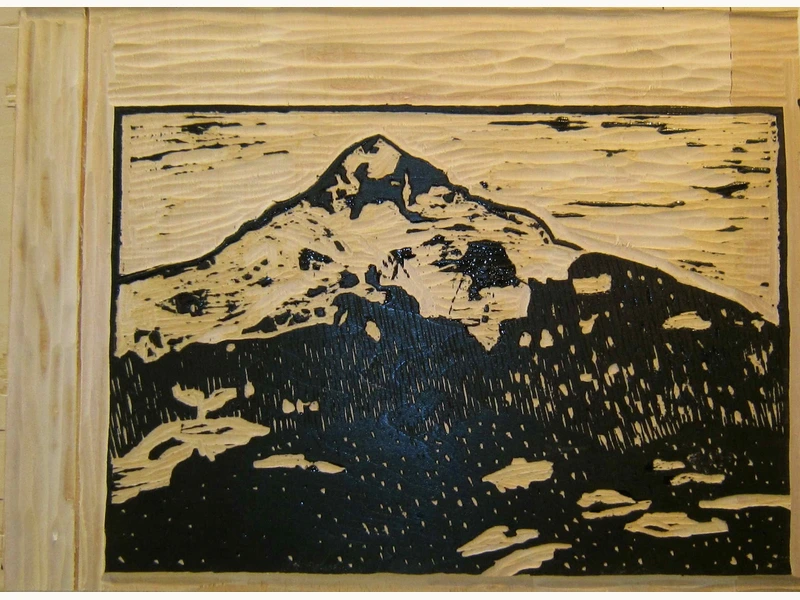
Do not read the overall darkness of these two historical proofs as a controlled carving test. The source does not specify identical ink films, paper moisture, or rubbing pressure. The useful comparison is local: where sky marks disappear, whether the ridge remains continuous, and where entirely new white contours appear.
Trim one area and print a new sheet
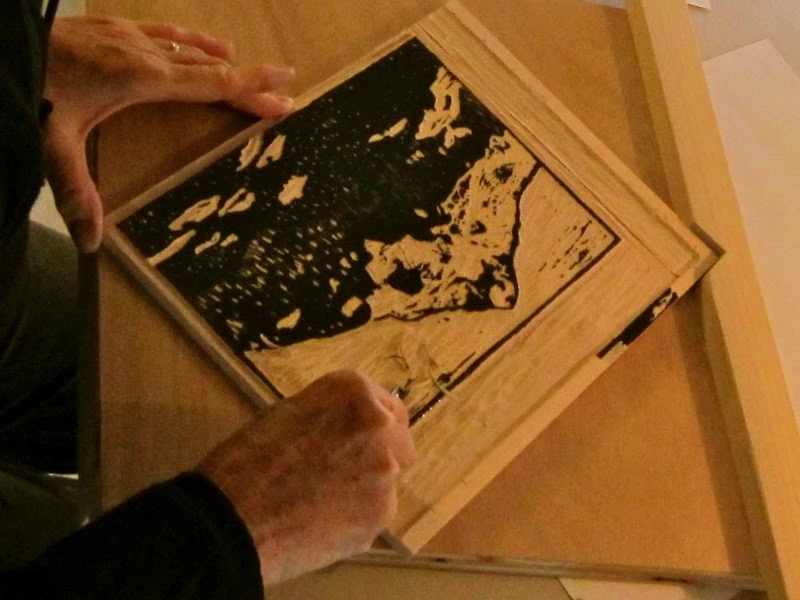
The working photograph places the same mountain block on a bench hook, with earlier paper proofs nearby. The cutter is working in the pale sky beside the dark ridge and border. This is the stage between the first and second proofs. The hand partly hides the cutting edge, so use the diagram and your tool’s instructions for blade setup rather than trying to copy an angle from this photograph.
Sources: Meredith Nemirov · Lone Cone: first proofs, recarving, and second proof
On your own block, choose one confirmed high spot in the waste, set a short end point, and take a thin cut that stays clear of the neighboring raised line. Clear the chips, inspect the edge, and stop before extending the repair to another area. If a chip starts to run toward the line or the line moves, lift the tool immediately. Re-establish the boundary and check the tool on the offcut before deciding whether the area can tolerate further work.
Re-ink and print on a fresh sheet. For a useful comparison, keep the paper, ink preparation, and pressure as similar as you can, and note any changes. Mark the two sheets outside the image as before and after. Re-rubbing the old sheet or printing over it can hide the result: you need to see what the revised block produces on its own.
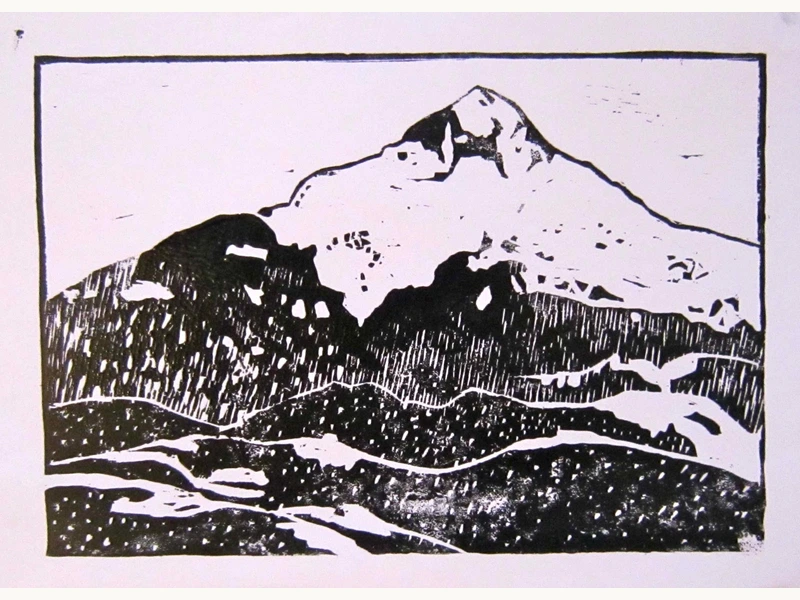
The second Lone Cone proof shows a much clearer upper-left sky, with the mountain outline still connected. A few small marks remain. Long white curves have also been added across the foreground, as the artist’s caption explains. Those curves demonstrate an intentional design revision, while the sky demonstrates clearing. Removing every remaining trace is not automatically an improvement; stop when the chosen area prints as intended and the surrounding image is sound.
Sources: Meredith Nemirov · Lone Cone: first proofs, recarving, and second proof
Know when more cutting will not help
An extra black spot can often be addressed by lowering unwanted wood. A missing black stroke is the opposite problem: its printing surface may already be gone. Repeatedly widening the white gap around a broken line usually makes the break more prominent. First confirm the loss on the cleaned block, rather than diagnosing it from one pale impression.
If the line has broken, preserve the rest of the block. You may be able to simplify the shape into a deliberate opening or accept a different edge. Try that change on a copy of the proof before carving again. Replacing lost wood with a fitted insert is a separate repair skill; it is not a beginner’s extension of clearing a high spot. This guide does not treat filler or a wood patch as a quick, guaranteed fix.
Sources: Walter J. Phillips · The Technique of the Color Wood-Cut: Cutting
If your offcut repeatedly tears at the detail you want, revise its scale or spacing before investing in another full block. The aim is a line that remains supported after clearing and prints consistently. In the Lone Cone revision, the useful gain is the open sky beside an intact ridge—the surrounding wood changed so that the retained edge could read more clearly.
Continue reading
References
Meredith Nemirov · Lone Cone: first proofs, recarving, and second proof
Letterpress Commons · Carving the woodblock
Walter J. Phillips · The Technique of the Color Wood-Cut: Cutting
McClain’s · Woodblock tools and their uses