

Design and Transfer Your Own Woodblock Image
Plan the inked shapes, revise crowded details, and trace a mirrored drawing onto a printing block.
By BeenEast Editorial · Published · Reviewed
Start with the image you want on paper
To prepare your own woodblock design, draw at the intended print size, decide which shapes will carry ink, and test the smallest features on an offcut of your chosen board. For carbon-paper tracing, mirror the planned print before tracing it onto the block. Keep that tracing face-up: printing will reverse the block once more.
Our reference is Weaving (2024), by Chinese printmaker Chen Mu, whose process is documented by the Guangdong institute of modern water-based woodblock printmaking. The archive includes design revisions, transfer, carving, and impressions of the same composition. It is an eight-block color work, not a single-block beginner project. Here we use it to examine design and transfer decisions; your exercise can be one small interlaced shape printed in one color.
Sources: Chen Mu · Weaving: a water-based woodcut case study
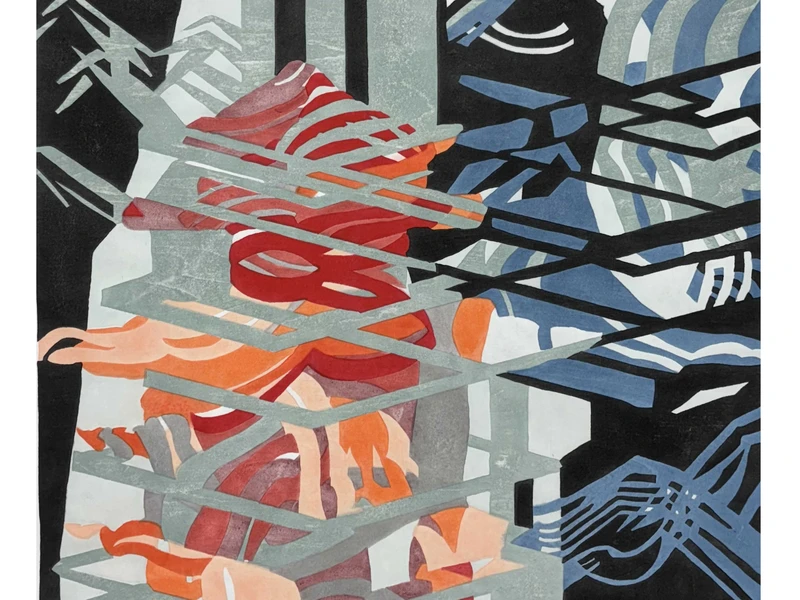
Choose one feature whose direction matters: a tall shape on the left, an opening on the right, or a ribbon that ends on one side. Mark the intended direction outside your image border. A symmetric design can hide a reversal mistake. Leave room around the image for handling and for the paper to rest; the image area, board size, and paper size need not be identical.
Decide what the lines mean
In a single-color relief print, the remaining high surface carries ink and the cut areas leave the paper visible. Black in your planning drawing represents the raised shapes you will keep and ink, even if the eventual ink is blue or red. An outline alone does not specify which side to remove. Fill the intended ink areas on a spare copy before carving.
Sources: The Met · Woodcut
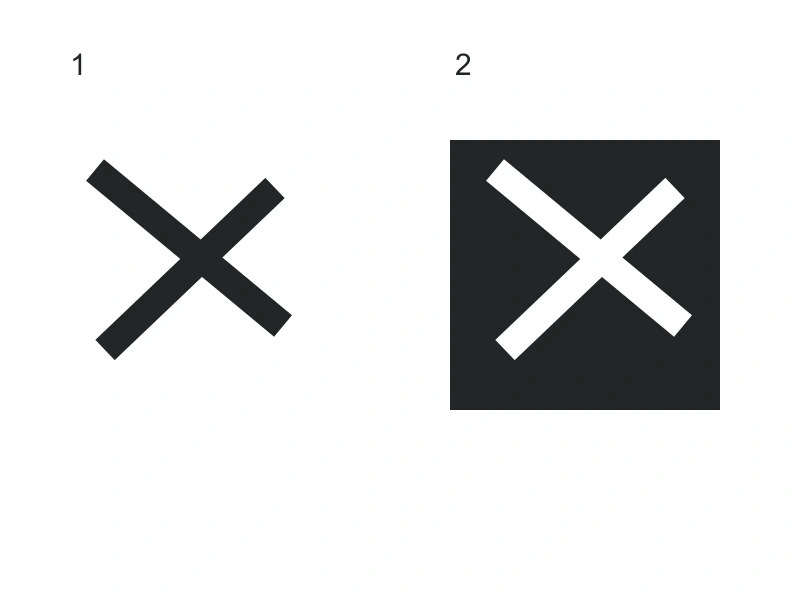
In study 1, the crossing is carried by dark bands, so you would clear the spaces around those bands. In study 2, the same crossing is a light channel within a dark field, so you would remove the channel and preserve the field. Both are valid designs. Decide whether the shapes should join at the crossing or remain separated by a visible gap; that choice changes where the tool must stop.
An isolated inked dot does not need a bridge to another shape as it would in a paper cutting: its base is still part of the board. Its vulnerability comes from a small or damaged raised section, especially if you undercut its sides. Keep support beneath the shape and test fragile details with your actual board and tools.
Sources: Letterpress Commons · Woodcut: transfer and carving
Simplify around a clear focal shape
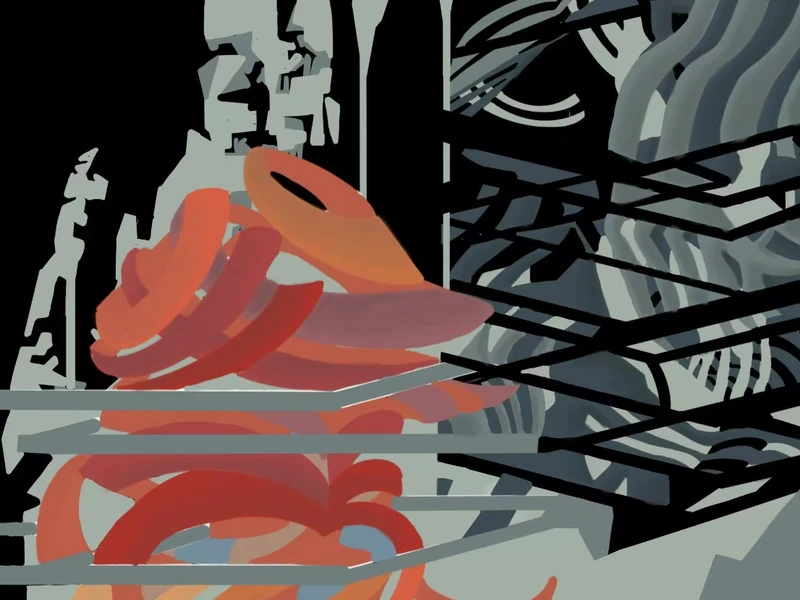
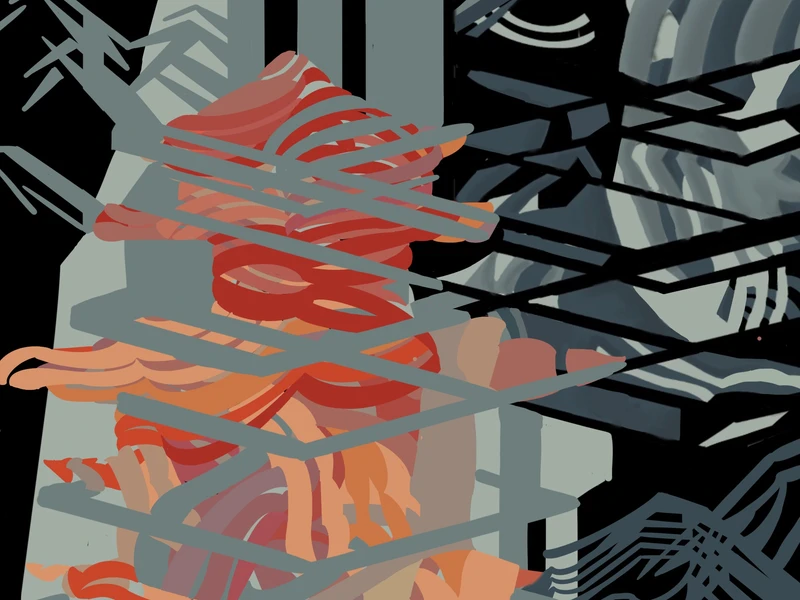
Compare the central forms in these two design details. The early version has looping orange bands; the later drawing gives the tower more angular, repeated tiers. Chen describes reorganizing scattered shapes and developing the woven structure. This is a recorded design change, not proof that fewer lines always make a better print. The revised foreground can be more detailed while the overall composition becomes easier to follow.
Sources: Chen Mu · Weaving: a water-based woodcut case study
For a first one-color design, keep the outer contour and the few internal marks that identify the subject. Then work on one crowded place: remove a redundant stripe, widen a gap, or shorten an overlapping band. Write down both the benefit and the loss. A wider gap may separate two forms more clearly, while removing every interior line may erase the woven structure you wanted to show.
Compare the earlier and revised drawings at the same intended print size. Cover the small textures: can you still recognize the main form? Uncover them: which marks add useful information? Keep the version that serves your image, then test its difficult features. Fletcher’s historical account connects design with lines and masses; its preference for Japanese color-print conventions is context, not a rule for every woodcut.
Test the features your design depends on
A clean drawing is not a test of the block. Use an offcut of the same board, prepared in the same way, and try a raised line, an open channel, and a crossing from your drawing. Work with the tools you intend to use. Secure the offcut and keep your supporting hand behind the cutting path; our first-print guide explains the carving setup.
Keep the test drawing and label the corresponding features on the proof. A ridge surviving the cut answers a carving question; its line appearing clearly on paper answers a printing question. If a channel fills in or a line disappears, inspect the block as well as the impression. Excess ink or uneven contact can hide a usable shape. Correct that cause before deciding to make the design wider.
Record each change and print again. There is no universal minimum line width here: material, surface preparation, support, tool, and handling all matter. Letterpress Commons recommends small material samples and tests. This exercise is for your own materials; the archive images shown in this guide do not document a separate test offcut or a physical trial performed by BeenEast.
Sources: Letterpress Commons · Woodcut: transfer and carving
Trace a mirrored drawing without moving it
For carbon-paper tracing, prepare a mirrored copy of the intended print at the size you will carve. Lay transfer paper on the prepared board with its coated side down, then place the mirrored drawing face-up above it. Tracing copies that drawing’s direction onto the board. Printing reverses it back. Test a short line on a scrap first: use enough pressure to leave a readable mark without denting the surface.
Sources: Letterpress Commons · Woodcut: transfer and carving
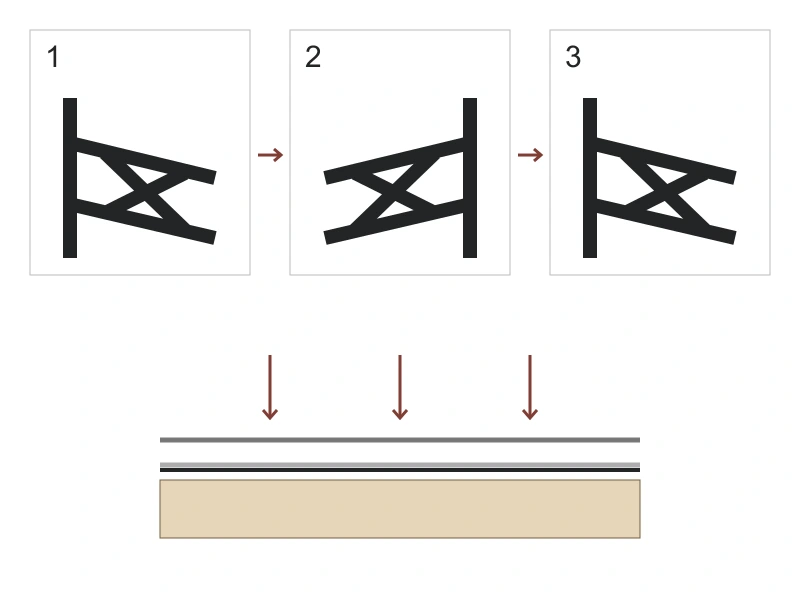
Align the drawing to the image border. For a small beginner study, tape one edge outside the design as a hinge and hold the free portion steady while tracing. The hinge lets you check progress without losing the sheet’s position. The setup diagram below is an editorial suggestion, not a claim that the artist used this exact arrangement.
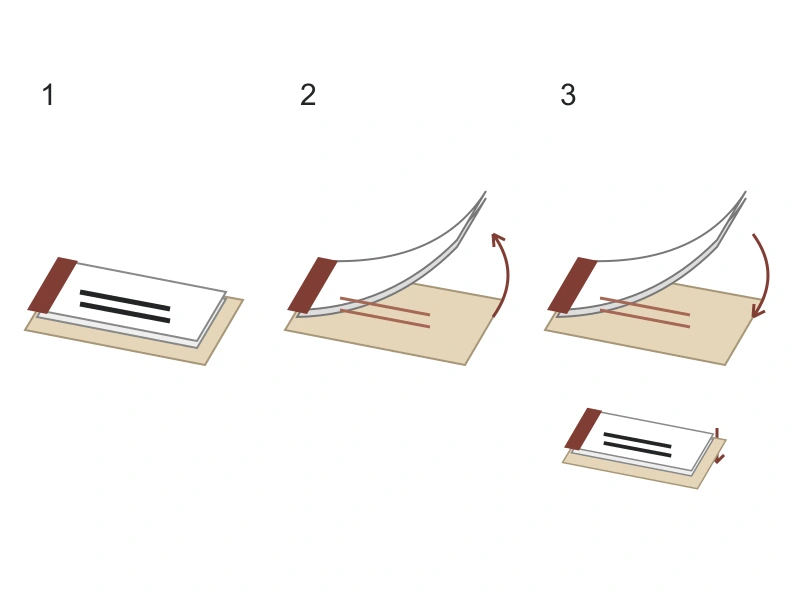
Trace the boundaries that define the shapes you intend to preserve. Lift the free corner of both the drawing and transfer sheet while leaving the taped edge attached. Check a corner, a narrow gap, and a solid area’s outline on the board. Lower the sheets along the same hinge before continuing. If the fixed edge has slipped, stop and realign to the original border and landmarks rather than tracing a second displaced outline.
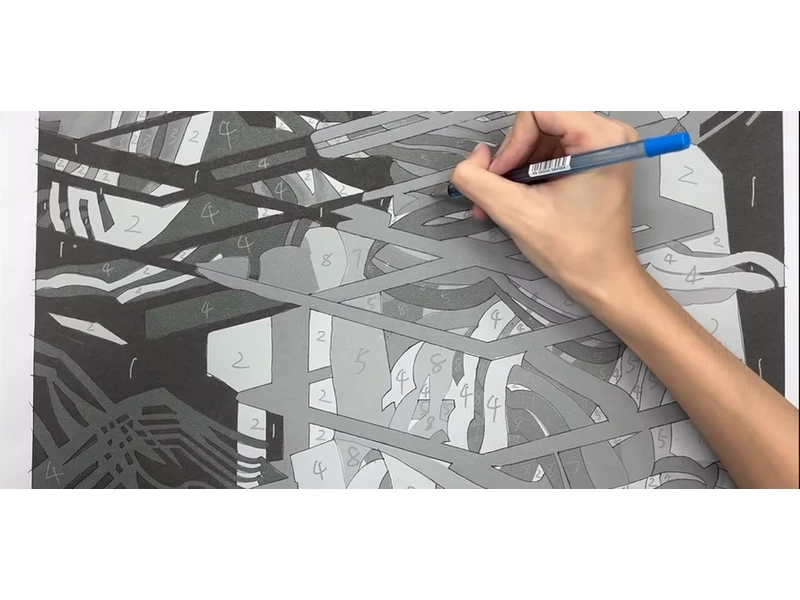
Chen’s process shows a hand tracing a mirrored, numbered drawing. The accompanying account identifies carbon paper between drawing and wood. The numbers organize a multi-block color design; a single-color exercise does not require eight numbered color areas. The photograph shows the tracing action, while the diagram above makes the hidden paper layers explicit.
Sources: Chen Mu · Weaving: a water-based woodcut case study
Face-down transfers are a different route. Eva Pietzcker’s account of a 2003 Shanghai demonstration describes pasting a thin drawing face-down with rice paste. That placement already reverses the drawing. Do not take a copy prepared for carbon-paper tracing and also turn its image face toward the block: the extra reversal changes the final result. Follow one complete method with suitable materials.
Read the transferred shapes before you cut
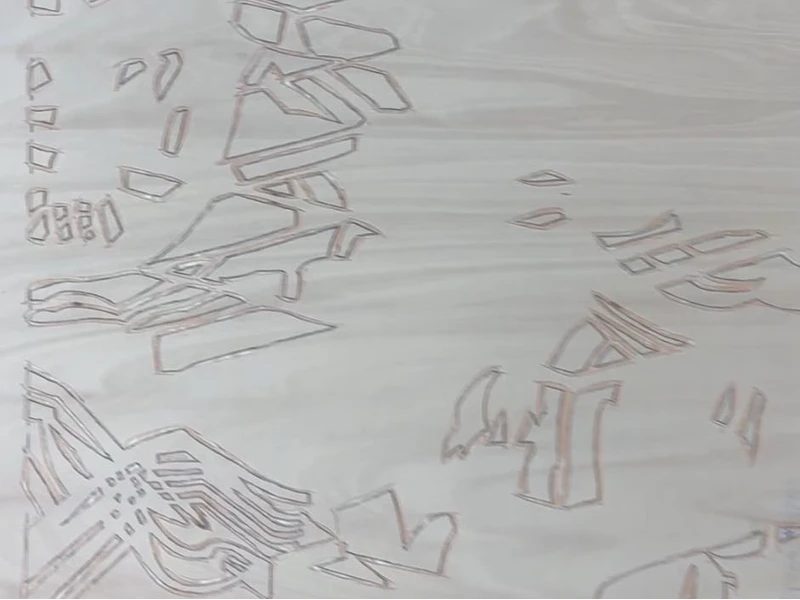
Inspect the transfer beside the planning copy at the same size. Check for a missing boundary, a doubled line, or a narrow gap that has become a smudge. A transfer mark is a guide to an edge, not automatically a line to preserve at its drawn thickness. Resolve uncertain areas while you still have the paper reference; reinforce only the intended boundaries.
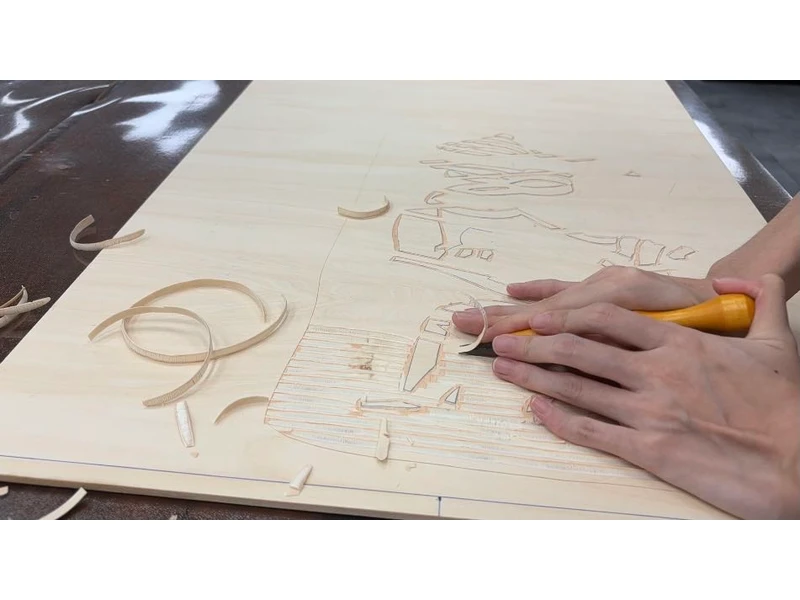
Before cutting, point to one shape that will remain high and one area you will lower. If the choice is unclear, return to the filled-in black-and-white plan. In the carving photograph, intact outlined shapes remain while material around them is removed. The main board is part of Chen’s color composition, not the separate offcut recommended in our exercise.
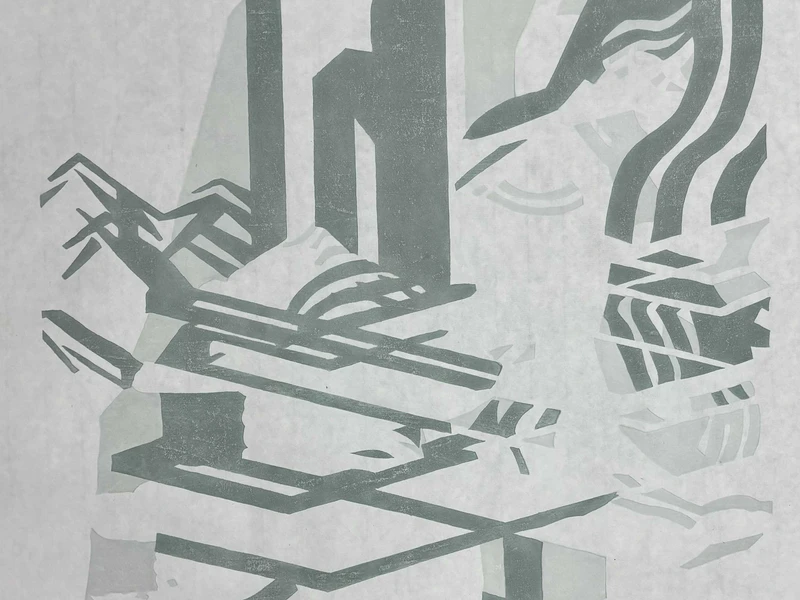
The illustrated early impression records one stage of the color build-up, not the finished artwork. Compare its long upright forms and crossing bands with the completed detail at the start. This comparison shows how transferred boundaries become printed shapes; it does not establish a minimum carveable width for another board.
Sources: Chen Mu · Weaving: a water-based woodcut case study
Your transferred design is ready for carving when the block is a mirror image of the intended print, the keep-and-remove choices are explicit, and the critical features have passed your own material test. Keep the approved drawing beside the block. After the first impression, compare the crossings and open gaps with that drawing before changing the design again.
Continue reading
The archive follows Chen Mu’s Weaving across design revisions, several color blocks, and printed stages. It is evidence of one composition, not one block throughout. BeenEast’s three diagrams and offcut exercise are teaching aids, not the artist’s experimental records or physical tests performed by BeenEast.
References
Chen Mu · Weaving: a water-based woodcut case study
Letterpress Commons · Woodcut: transfer and carving