

Tools and Materials for Your First Chinese Woodblock Print
Choose a compatible block, carving tools, brushes, ink, and paper for hand brush-printing.
By BeenEast Editorial · Published · Reviewed
Start with one complete brush-printing method
For a first Chinese woodblock print, you need a prepared wooden block, a way to transfer the design, tools suited to carving that wood, a secure work surface, ink and an inking brush, printing paper, and a separate tool for rubbing the back of the sheet. Choose these as a compatible set: the block must work with the knife, and the ink must transfer onto the paper under pressure applied from its back.
This guide focuses on brushing ink onto a wooden relief and rubbing the paper by hand. A relief is the raised surface left after the surrounding wood is cut away. A kit containing only a finished block, ink, brushes, and paper can let you print immediately, but you will still need carving and transfer supplies to make your own block. Tongji University’s April 2021 activity is a useful example of the first kind: students printed from two prepared text blocks.
Sources: Tongji University · A woodblock printing experience, 2021
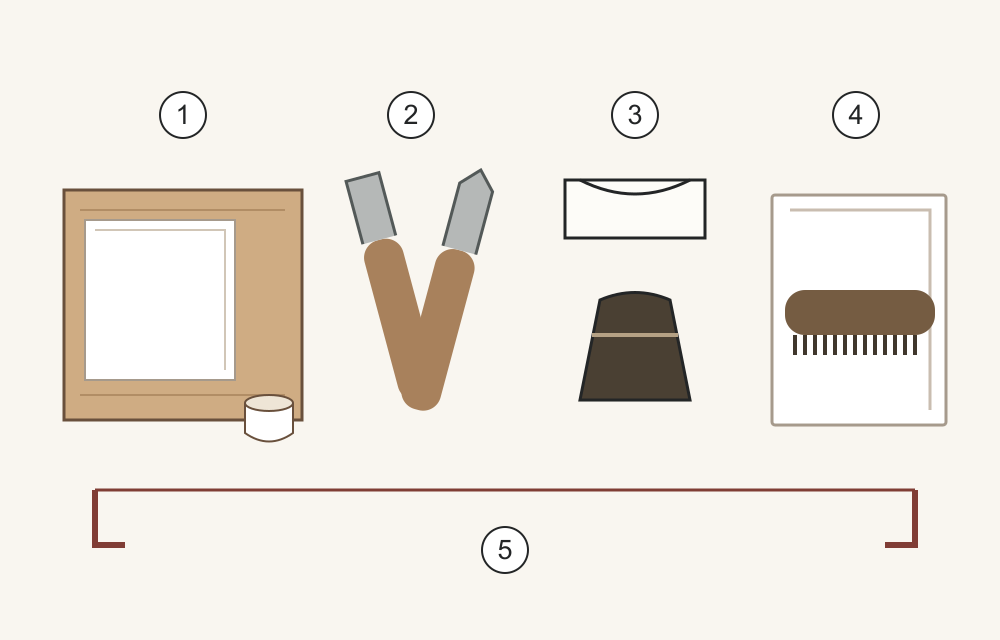
| Job | What belongs here | What to check |
|---|---|---|
| Prepare the image | A prepared block and matched transfer supplies: carbon paper, or thin drawing paper and paste | The design must remain readable on the wood without a thick paper layer hiding the cuts. |
| Carve and hold the block | Wood-rated knives or gouges, a block stop or suitable clamp, and sharpening support | The tool must cut the chosen wood controllably while the block stays still. |
| Apply ink | Compatible ink, a small ink container, and an inking brush | The brush must distribute the chosen ink over the raised printing surface. |
| Make the impression | Printing paper and a separate paper-back rubbing brush or tool | The sheet must receive the ink and withstand rubbing without shifting or tearing. |
| Lay out and clean up | A clean place for prints to dry, waste sheets, and cleaning supplies specified for the ink | Wet prints need room to stay separate; cleanup follows the actual ink’s instructions. |
Use the table to read a kit description. If it lists a roller and a slab for rolling out ink, check the method before ordering: those items belong to a different inking setup. A hand-rubbed Chinese print does not require a printing press; pressure is supplied from the back of the sheet.
Sources: Grolier Club / Rare Book School · Chinese printing tools · Jackson’s Art · Woodcut tools and materials
Choose prepared wood, then match the transfer
UNESCO’s account of Chinese engraved-block printing names fine-grained pear and jujube wood and describes smoothing the block before engraving. Fine grain matters because the design depends on small pieces of wood remaining intact. A rough, damaged surface can interrupt a raised line before you reach the printing stage.
Sources: UNESCO · China engraved block printing technique
For a first purchase, ask for a block already prepared for woodblock carving. Check that it rests without rocking on a flat support, that the printing face has no obvious bow or deep scratches, and that cracks or knots do not run through the intended image. These are practical inspection points, not proof of a particular wood species. A label saying “pear wood” does not tell you whether the block has been dried, flattened, and prepared for carving.
Prepared plywood and woods such as magnolia or katsura appear in other woodcut teaching materials. That makes them candidates to investigate, rather than confirmed substitutes for the brush-printing setup here. Ask for a sample cut and impression made with the proposed block, knife, ink, and paper together. A smooth surface alone does not demonstrate how it will carve or print.
Sources: Jackson’s Art · Woodcut tools and materials
Keep transfer paper separate from printing paper in your materials list. The transfer sheet carries the drawing onto the wood; the printing sheet receives the impression later. In the Shanghai demonstration recorded by printmaker Eva Pietzcker in 2003, a very thin drawing sheet was pasted face-down onto the block with rice paste. Thin paper let the drawing guide the cutting. Ask for the transfer sheet and paste used in the method you will follow, rather than assuming ordinary thick drawing paper will behave the same way.
Choose carving tools by the cut they make
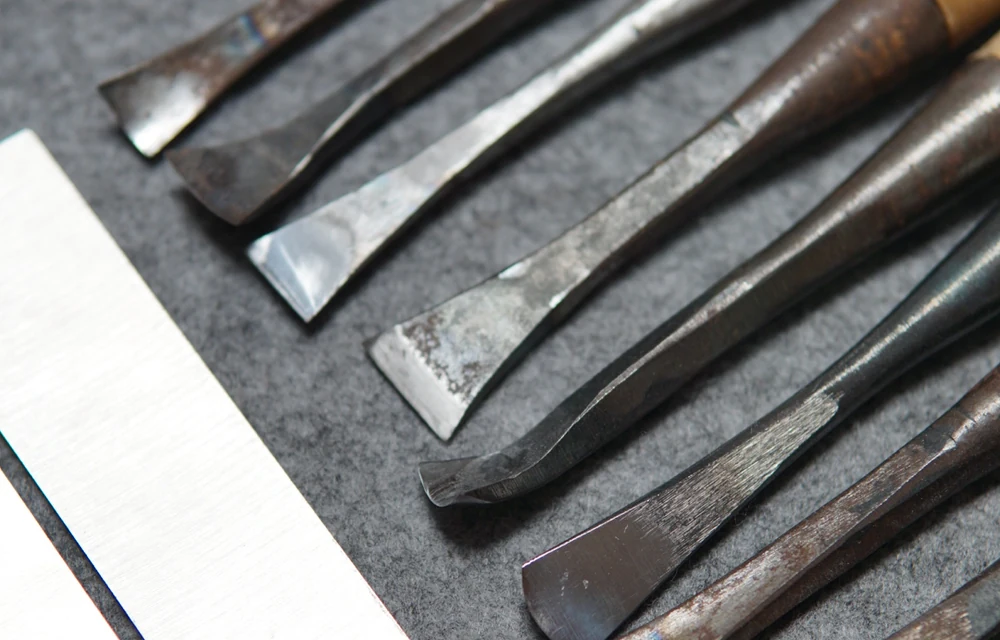
Look at the exposed steel in the photograph: the mouths differ in width and curvature. Those differences affect the shape of wood removed. A V-gouge has an angled mouth for narrow cuts; a U-gouge has a rounded mouth for scooping a wider channel. Start by matching a tool’s job to the marks your design needs, then confirm that it is rated for the chosen wood.
Sources: Jackson’s Art · Woodcut tools and materials
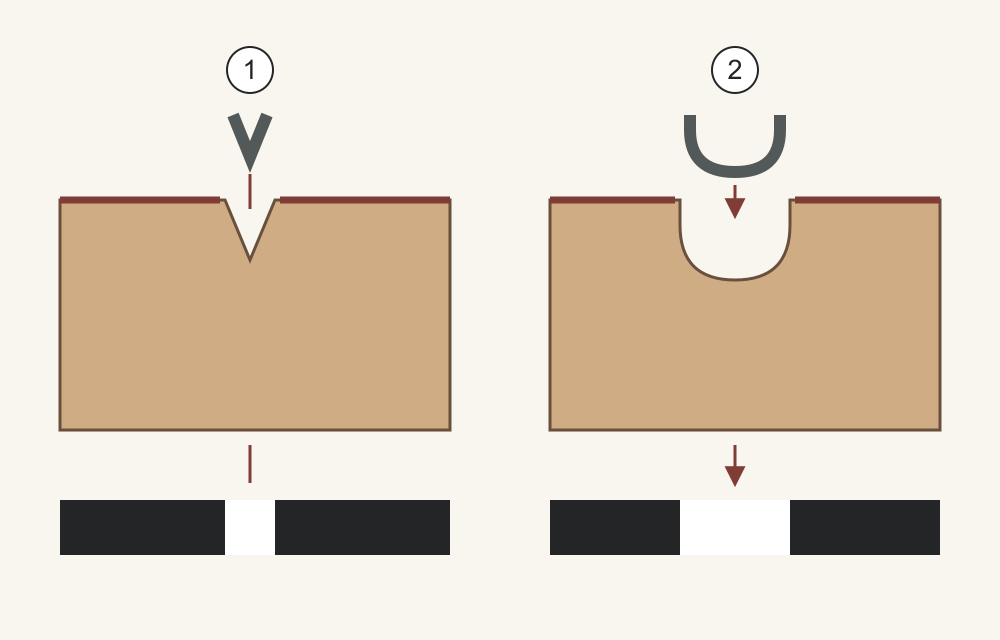
The diagram shows a consequence that is easy to miss when shopping. A groove removes the printing surface, so it makes a light mark inside an inked area. To print a dark outline, you keep the wood beneath that outline and clear beside it. A wider clearing tool helps remove background, but its mouth must fit between the edges you need to preserve. Buying the narrowest blade will not by itself produce the finest printed line.
Traditional tools include the fist knife, or quan dao. Pietzcker’s demonstration describes a custom-fitted, two-ended knife used for outlining and clearing. Its specialized shape and grip belong to a taught practice. For your first set, choose woodcut tools with a grip and maintenance method your instructor can demonstrate; the reference photograph is not a lesson in using a fist knife.
Sources: Eva Pietzcker · Chinese Woodblock Printmaking
Wood has grain, so resistance can change with the cut’s direction. Linoleum has a different structure, and a lino label alone does not confirm a blade is suitable for your wood. Sharp edges improve control; blunt tools can skate instead of cutting. Secure the block with a suitable stop or clamp, keep both hands out of the forward cutting path, and have a teacher check the edge and setup before trying to force a reluctant cut. Include sharpening instruction or a sharpening service in the plan for your tools.
Give the two brushes different jobs
The inking brush touches the bare block. Its fibers carry and spread ink across the raised surface. The rubbing brush or burnisher touches the back of the paper after the sheet is laid down. It supplies pressure through the paper. Keeping the two roles separate helps keep unwanted ink off the sheet’s back.
Sources: Grolier Club / Rare Book School · Chinese printing tools
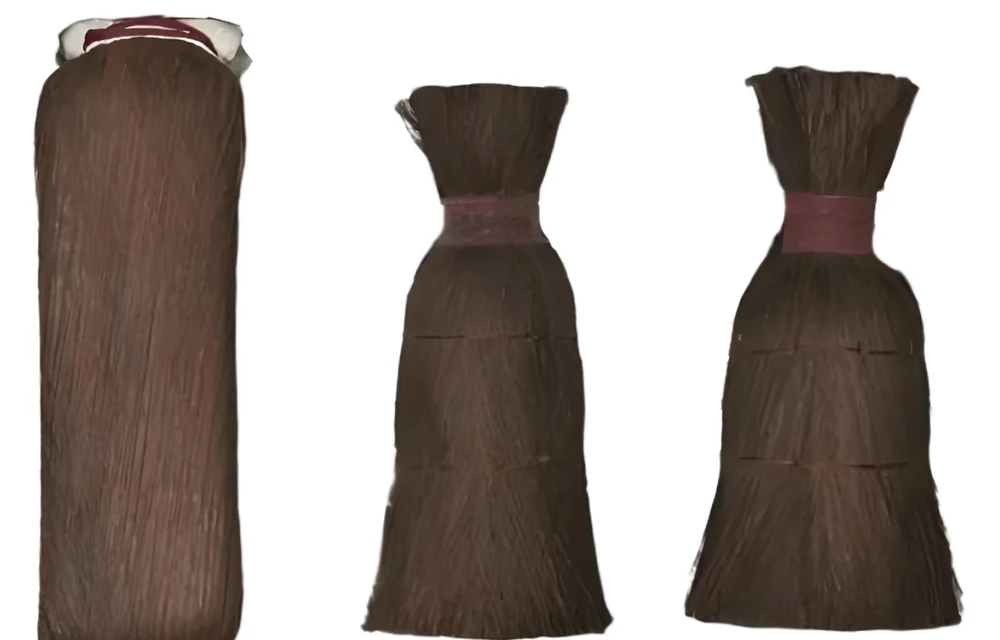
Grolier Club’s description of Rare Book School’s tools makes this division explicit: a round coir brush inks the wood, and a rectangular brush or burnisher makes the impression through the paper. Shape is a clue to function, but the actual contact face and method still need to be checked.
Sources: Grolier Club / Rare Book School · Chinese printing tools
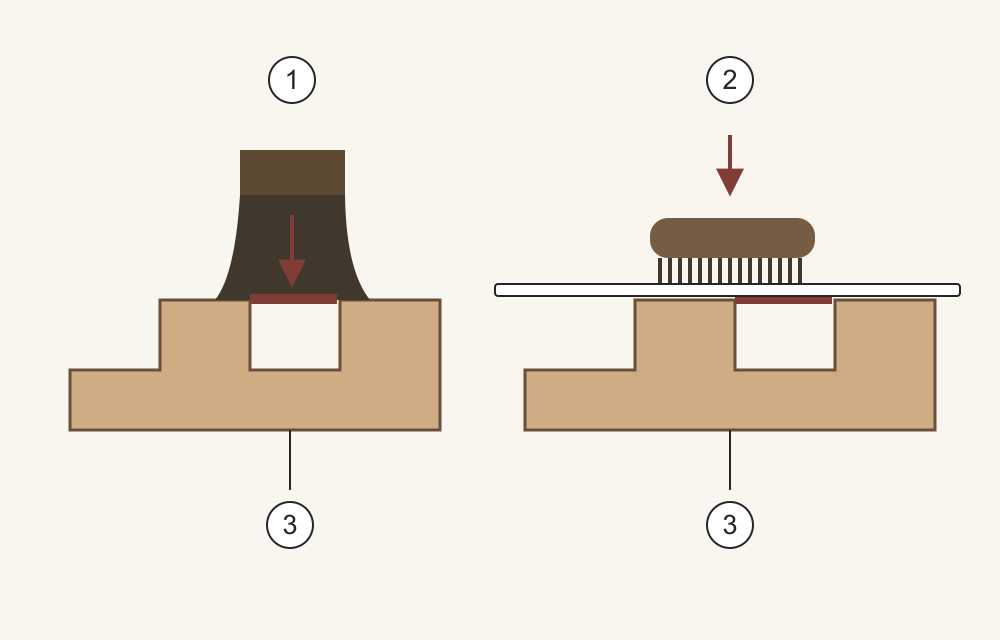
Ask a supplier to identify both contact faces, not simply to include “a brush.” A painting brush, a stiff scrub brush, and a paper-back rubbing tool are not interchangeable purchases just because each has fibers. For a first order, request a demonstration with the brush pair, block, ink, and paper you intend to use. A baren or spoon belongs to another possible pressure setup; assess it with that setup’s paper and instructions before substituting it.
Choose ink and paper together
Begin with ink recommended for the particular brush-printing method you will learn. “Water-based” describes only part of an ink’s behavior: it does not tell you whether the ink is formulated to be brushed onto wood or rolled into a film. Roller-applied relief inks are a separate purchasing category. Check the intended application, dilution instructions, and cleanup directions on the actual product.
Sources: Jackson’s Art · Woodcut tools and materials
Paper must conform to the printing surface and survive rubbing. A thick, stiff sheet can be harder to bring into contact by hand; a delicate sheet can be damaged by excessive rubbing. Tongji’s 2021 session used xuan paper and warned that heavy pressure could break the sheet. Its account also describes adjusting the amount of ink and spreading it evenly. Those observations concern that activity’s prepared blocks and supplies, not every paper sold as xuan.
Sources: Tongji University · A woodblock printing experience, 2021
Ask for the exact paper, its surface treatment, and whether that method uses it dry or with a stated preparation. Pietzcker’s Shanghai demonstration used dry paper. That is evidence for one documented method, not an instruction to dry-print every Chinese woodblock or to dampen every sheet. Follow the paper preparation supplied with the chosen method, and keep the transfer sheet’s preparation separate from the printing sheet’s.
Sources: Eva Pietzcker · Chinese Woodblock Printmaking
Before committing a full pack, ask to see a proof made with the same ink and paper on the proposed block. Look at a solid area, a fine retained line, and an open gap: does the ink transfer across the solid, does the line remain distinct, and does the gap stay clear? These checks help assess the combination. They do not isolate a paper or ink defect, because carving, ink amount, paper movement, and pressure can all affect the impression.
Turn the list into a usable first set
A useful supplier reply names the block, the tools that cut it, the two brush functions, the ink, and the paper preparation. You can ask: “I want to carve a small wooden block and brush-print it by hand on paper. Which prepared block and woodcut tools work together? Which brush inks the block, and which tool rubs the paper’s back? Please identify the ink and paper, say whether the paper is used dry or prepared, and show a sample cut and print made with that combination.”
The tools become a usable set when their contact points agree: the knife can clear wood while preserving the intended edges, the ink brush reaches the retained surface, and the separate rubbing tool brings paper against that surface. A proof with a continuous dark area, a distinct line, and a clear gap lets you assess those relationships together.
Continue reading
This guide explains how to assess a Chinese brush-printing setup. Historical demonstrations, tool references, and original diagrams are identified where used. No specific starter kit or substitute material combination has been physically tested by BeenEast.
References
UNESCO · China engraved block printing technique
Eva Pietzcker · Chinese Woodblock Printmaking
Grolier Club / Rare Book School · Chinese printing tools