

How Lacquerware Is Built Up and Finished
Learn how thin coats build a lacquer finish and how carving reveals the colors beneath.
By BeenEast Editorial · Published · Reviewed
What the layers do
Lacquerware is built up in thin coats that harden between applications. These layers protect the body of the object and create its colored surface. For carved lacquer, they also provide the depth needed to cut a design. Along the way, smoothing prepares each surface for the next coat, while the final finish gives the piece its sheen.
Sources: The Met — Lacquerware of East Asia
Tree-sap lacquer, called urushi in Japan, can be applied in several ways. Wiped lacquer leaves the wood grain visible. Other methods begin with a foundation of lacquer mixed with fillers, followed by colored coats. For carving, the maker builds a thicker coating so that a blade can cut grooves and leave raised shapes above them.
Sources: Japan Kogei Association — Urushi application techniques · The Met — Lacquerware of East Asia
Why thin coats cure evenly
Curing turns liquid sap into a solid film. An enzyme in the sap helps its molecules link together in the presence of oxygen. Humidity supports this reaction, so lacquerers use warm, humid cabinets. A thick coat can set on top while remaining soft underneath. Thin applications allow the coating to harden more evenly through its depth.
Sources: The Met — Lacquerware of East Asia · The Met — The Arts of Korea, “Lacquer” · Yang et al. — Prepolymerization of Lacquer Sap, Introduction
The lacquer must be firm enough to withstand the next tool. In the processes described below, makers let it harden before sanding or carving. How long that takes depends on the lacquer, the thickness of the coat, and the temperature and humidity.
Sources: Yao Urushi Kougei — Process and method, steps 7–13 · The Met — Matsumoto Tatsuya, Carved Lacquer Box “Green Flower”
Smoothing between coats
Between coats, sanding prepares an even base for the next application. At the Japanese workshop Yao Urushi Kougei, makers first smooth a lacquer-based foundation with a whetstone. They then brush on an undercoat, let it harden, and sand it before applying the middle coat. Each round prepares the piece for the next layer.
Sources: Yao Urushi Kougei — Process and method, steps 7–13
Carved lacquer also depends on this gradual preparation. For his 2012 box “Green Flower,” Matsumoto Tatsuya let each colored coat harden and polished it before brushing on the next. Once the layers had built up and hardened enough, he cut the design with a small chisel-like blade. The Met describes how cuts of different depths exposed different colors.
Sources: The Met — Matsumoto Tatsuya, Carved Lacquer Box “Green Flower”
Finishing the top coat
Japanese lacquer makers can finish a piece in two ways. With nuritate, they leave the final coat as it hardens after brushing. With roiro, they smooth and polish the hardened top coat to a high gloss.
Sources: Japan Kogei Association — Urushi application techniques
In Yao Urushi Kougei’s roiro process, charcoal and a whetstone smooth the hardened top coat. Finer abrasive powder then refines the surface. The craftsperson rubs in a thin application of lacquer, lets it harden, and polishes it to develop the final gloss.
Sources: Yao Urushi Kougei — Process and method, steps 7–13
Carving gives the built-up lacquer grooves and raised motifs as well as color. Matsumoto’s box shows how a maker prepares and cuts those layers. The much older cup below reveals the result in its red and dark bands. Its museum record identifies the materials, although the exact sequence used to make it is unknown.
Sources: The Met — Matsumoto Tatsuya, Carved Lacquer Box “Green Flower”
Reading the layers on a carved cup
Dark scrolls curl around this small Chinese cup just below the rim. The Met identifies it as tixi, carved lacquer with differently colored layers. Red lines appear along the sloping walls of the grooves, tracing the curves of the dark scrolls.
Sources: The Met — Guri lacquer cup · The Met — Cinnabar, exhibition gallery
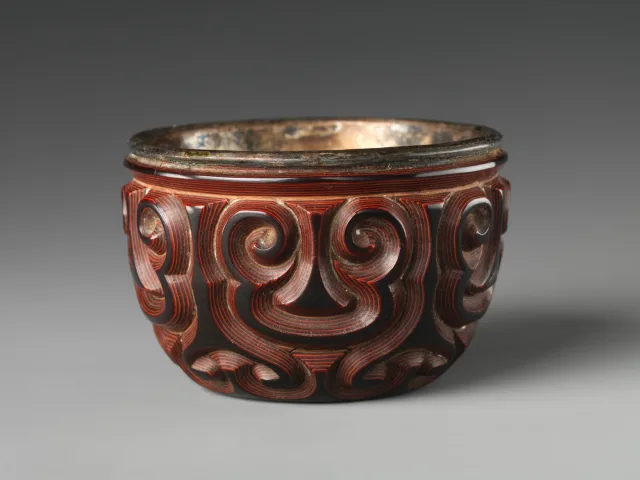
The close-up shows the large scroll at the front of the cup. Parallel bands curve along the sides of the cut. Their width depends partly on the angle of the blade, because a sloping cut exposes more of a layer than a cut straight through it. Several coats of the same color can appear as one band, so the visible stripes cannot give an exact coat count.
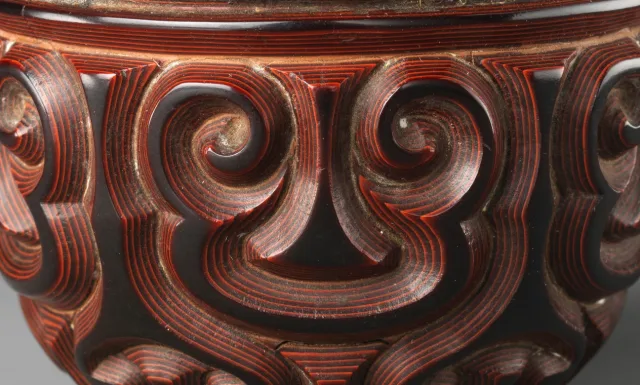
On this cup, the colored bands make the depth of the carving easy to follow. The layers that once covered the cup now form the sides of its scrolls. Building up, smoothing, and cutting the lacquer have each helped shape the finished design.
Sources: The Met — Guri lacquer cup
Continue reading
Prepared by BeenEast Editorial using museum records and published craft processes. The photographs show a finished Yuan dynasty cup. The Japanese examples describe the methods of their respective makers.
References
The Met — Lacquerware of East Asia
The Met — The Arts of Korea, “Lacquer”
Yang et al. — Prepolymerization of Lacquer Sap, Introduction
The Met — Matsumoto Tatsuya, Carved Lacquer Box “Green Flower”
The Met — Cinnabar, exhibition gallery