

Troubleshoot Your Woodblock Proof: Pale Color, Bleeding, and Double Edges
Compare earlier and later impressions from the same block set, then choose a specific check before making a fresh proof.
By BeenEast Editorial · Published · Reviewed
Compare the proofs before changing the block
To troubleshoot a pale, patchy, or blurred woodblock print, first compare the same feature on two proofs in similar light with both sheets in the same condition. Then check pigment coverage and printing order, paper contact and movement, and the preparation of your paper, pigment, and block. Correct one confirmed problem and print a fresh sheet. Recutting comes after you have located an unwanted high spot on the wood.
A proof is a trial impression kept to judge the next print. This guide continues the first single-color exercise, using brush-applied water-based color and a baren, the flat tool rubbed over the paper’s back. The photographs come from a Chinese multicolor demonstration with precarved blocks. They help us read printing differences; you can practice the checks with one color on your existing block.
Keep both sheets and compare their printed faces after both have reached the same condition, such as fully dry. Match an outline, a broad colored area, and an intended white opening. A wet sheet can look different after drying, so a wet-versus-dry color comparison can send you toward the wrong correction. Number each new sheet in a clean margin and note any extra printing passes.
Sources: CAFA · Yang Pengcheng on paper and block moisture · CAFA · Yang Pengcheng on teaching water-based woodcut
Read an earlier and a later print from the same blocks
In the recorded demonstration, beginner Xiao Wu prints first. A Jun, introduced as representing the experienced printers, then works with the same set of blocks. Both completed sheets show a fish pointing right, fingers around its body, and green areas behind it. The recording identifies the blocks as the same set; the repeated landmarks let us match features across the two sheets.
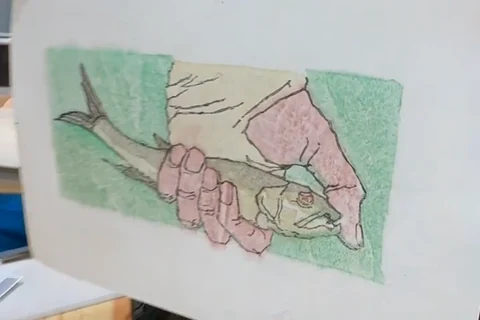
On the earlier sheet, the black contour describes the fish and fingertips, but much of the fish’s body is close in value to the paper. The green background contains many pale interruptions. This is a coverage observation: the outline survived, while the broad color areas did not transfer with the same strength. It does not tell us whether pigment, moisture, timing, or rubbing was responsible.
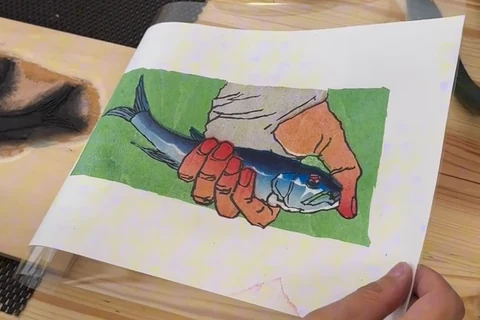
| Landmark | Earlier sheet | Later sheet |
|---|---|---|
| Fish back between the tail and fingers | Pale color within a visible outline. | A broad dark blue band and a lighter lower area. |
| Fingertips around the fish | Light pink areas bounded by black lines. | Red color fills the finger shapes more strongly. |
| Green area beside the tail | Many pale breaks interrupt the green. | The green reads as a fuller area, with texture remaining. |
The later sheet demonstrates that this block set can produce stronger color without a different design. It does not establish a repair recipe: the printer changed, the recording does not fix all printing conditions, and the two sheets were filmed separately. Use the difference to choose what to investigate, then test that choice on your own block.
Separate missing pigment from missed contact
If one part is pale, map it back to the raised area that should have printed it. Remember the left-right reversal between block and impression. Before lowering the next sheet, check that this area carries color and that small edges have not dried while you worked elsewhere. A dry patch or a missed corner calls for correcting the application before adding pressure.
Sources: CAFA · Three factors in water-based woodcut printing
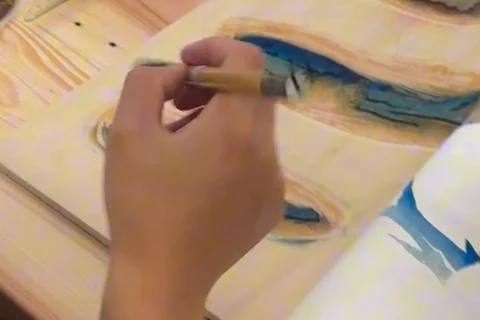
Two things have to meet: color on the raised wood and paper against that color. A wrinkle can bridge an inked area without touching it; pressing only around the wrinkle leaves the missing contact unresolved. Water adds another condition. In this method it helps color enter the paper’s fibers, while drying during brushing and repeated lifting changes how readily that transfer happens. That is why the same pale appearance can lead to different corrections.
Sources: CAFA · Three factors in water-based woodcut printing
If the surface was covered, review contact next. Did the sheet settle flat, or was a wrinkle or raised edge keeping part of it off the wood? Did your rubbing pass reach that area through the clean backing sheet? Keep the paper fixed while rubbing. For a missed area, try a complete, even pass on a new proof; stop if fibers lift or the paper scuffs. More force cannot compensate for a sheet that is moving or tearing.
When coverage and contact are repeatable but the color still transfers poorly, check the instructions for the actual paper and pigment. Water is shared among the wood, color, and sheet, and that balance changes during printing. Do not add water to all three at once. A dampening routine for one xuan paper is not a universal setting for every paper sold under that name.
Sources: CAFA · Three factors in water-based woodcut printing
Tell a spreading edge from a second outline
A soft fringe that spreads beyond a shape and a second, displaced contour require different checks. In the diagram, follow the same corner through three states: one defined edge, a diffuse fringe outside it, and a second edge offset from the first. The shapes represent symptoms, rather than measured results from the fish demonstration.

For a spreading edge, inspect the block for pooled color and check whether the sheet was wetter than your preparation calls for. Excess water can carry color outward through the paper’s fibers and leave a less defined boundary; very wet paper is also easier to damage. Correct the first confirmed moisture or loading problem within your method’s instructions, then make a new proof. Pressing harder does not remove the excess water that is spreading the color.
Sources: CAFA · Three factors in water-based woodcut printing · Hiroshi Yoshida · Failures and Suggestions
A doubled contour suggests a position problem to investigate: the sheet may have slid, or it may have been lowered again in a different position. Check the holder and how you lowered and lifted the paper before changing the carving. In multicolor work, paper moisture can also change the sheet’s dimensions, so a color that no longer meets the outline is not automatically a bad carving. Yoshida discusses that distinction in Japanese woodblock printing; it is a warning to investigate, not a reason to copy his registration system into this exercise.
Trace a repeating mark back to the block
Compare the location and direction of an unwanted mark on successive proofs. A line that repeats at the same place may correspond to wood grain or an actual feature of the block. A mark that changes position points you toward the brush, backing, loose fibers, or the rubbing path. Position is a clue for the next inspection, not a diagnosis by itself. Yoshida specifically distinguishes fixed wood-grain patterns from shifting baren marks.
Sources: Hiroshi Yoshida · Failures and Suggestions
For a dark spot inside an intended white opening, put the blade aside and inspect the matching recess. Remove loose chips or fibers without scraping the retained edge, and clear accidental color using the cleaning method suited to your pigment. Re-ink and make a fresh proof. If the white opening returns, the printing correction was enough. If the same spot persists and you can see unwanted raised wood at that point, secure the block and ask your teacher to check it before recutting.
Visible wood grain can be part of the intended water-based print. Decide whether you want a textured area or a more continuous field before calling every pale line a fault. Stop experimenting on the printed surface if the sheet is torn, heavily scuffed, or stuck to the block; release it carefully and correct the preparation before another attempt.
Make the next proof answer one question
Use this editorial retest method with the block, compatible materials, and paper holder from your first exercise. Use paper from the same batch and keep the pigment preparation consistent. Use fresh sheets and compare them after the same drying stage. Choose one symptom and one landmark; “the whole print looks weak” is too broad to test.
| Step | Do this | Read the result |
|---|---|---|
| 1 · Establish the symptom | Keep proof 1. Identify one pale part and find its matching raised surface. | Confirm that you are comparing printed faces and the same feature. |
| 2 · Choose a confirmed problem | If that area was visibly missed during brushing, correct only that coverage. Keep the paper preparation and rubbing routine consistent. | If you did not observe missing coverage, do not assume it. Choose the next check instead. |
| 3 · Print a fresh sheet | Number it 2 and note the correction, extra passes, and any unintended changes. | A clearer target area with intact paper supports keeping this adjustment for the next repeat. |
| 4 · Repeat or stop | Repeat the chosen setup on proof 3 before adding another change. | If the result does not repeat, inspect timing and moisture drift. If paper is damaged or the block’s surface is suspect, stop and check the setup with your teacher. |
Adding color to the same sheet is overprinting. It can be a deliberate way to build tone, but it changes the number of passes and may alter moisture and registration. Keep those sheets as a separate sequence. They cannot stand in for the fresh-sheet pair used to judge one change.
You are ready to continue when the chosen outline is readable, the intended opening stays clear, the paper remains intact, and you can repeat the result. The color may still contain wood grain or a planned gradient. Keep the successful proof beside the block as the reference for your next sheet.
Continue reading
The three photographs are distinct frames from one recorded printing demonstration. Xiao Wu’s earlier sheet and A Jun’s later sheet share the same block set, but they are not a controlled before-and-after experiment. The block designer, exact materials, moisture values, and fully dry color were not established. Technical sources explain possible causes; the fresh-sheet retest is BeenEast’s editorial practice method, not a test physically performed by BeenEast.
References
CAFA · Three factors in water-based woodcut printing
CAFA · Yang Pengcheng on paper and block moisture