

How Do You Sew Running Stitch by Hand?
Bring the needle up and down through woven cotton to make three even dashes. Lay the cloth flat, then compare the stitch lengths and the gaps between them. Then use shorter stitches and gaps where a curve turns sharply.
By BeenEast Editorial · Published · Reviewed
What is running stitch?
Running stitch makes a dashed line. Bring the needle up through the cloth, take it down a short distance ahead, then move forward underneath before coming up again. The thread you see on the back bridges the spaces left bare on the front.
Set up a short practice line
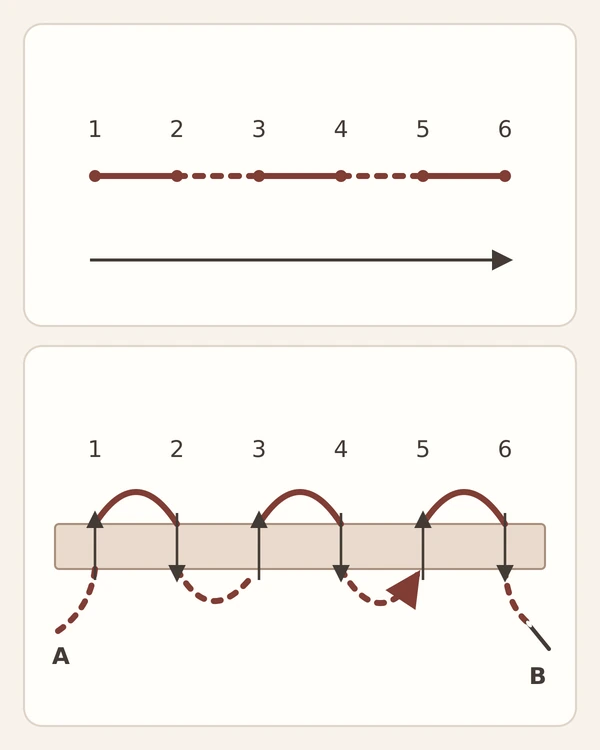
Put a scrap of smooth woven cotton in a small hoop. Tighten it until the cloth lies flat and the weave still runs straight. Thread a sharp embroidery needle with two strands of contrasting cotton floss. Test a removable fabric marker on the scrap, then mark six equally spaced dots in a straight line. Number them 1 to 6 in the direction you will sew. Leave about 2 inches (5 cm) of thread at the back when you come up at 1. This is tail A in the diagram. Hold it lightly against the back until the first two stitches are in place. Leave it long enough to rethread the needle when you finish.
Work one stitch and one gap at a time
Come up at 1
Bring the needle from the back to the front at 1. Keep tail A underneath.
Go down at 2
Take the needle down at 2. Pull gently until the first dash lies against the cloth.
Come up at 3
Move the needle underneath from 2 to 3 and bring it up. The front stays bare between those two marks.
Go down at 4 and repeat
Go down at 4. Once stitch 3–4 lies flat and the 2–3 gap is smooth, come up at 5 and go down at 6. Stop there with the needle and attached thread B on the back.
The upper panel shows the stitches from above. The lower panel shows them from the side, with the horizontal band representing the cloth. The arcs are raised in the drawing to show the thread path. As you sew, pull each stitch gently until it lies against the cloth.
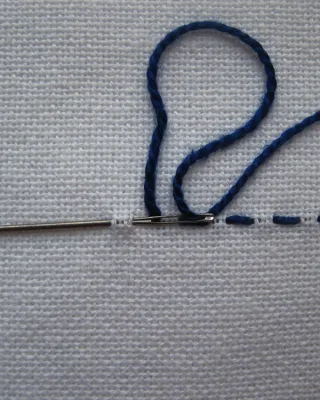
With the cloth taut in the hoop, bring the needle through at one mark at a time. On soft cloth held without a hoop, you can hold the needle nearly parallel to the surface and pick up a few fabric threads before pulling the floss through, as shown in the photograph.
Sources: Wikimedia Commons · Running stitch uk.jpg (Навка, CC0)

Check spacing and tension
Before securing the ends, take the scrap out of the hoop and lay it flat in even light. The three dashes should rest against the cloth, with two clear gaps and a flat surface around them. Compare the dashes with one another first, then compare the gaps.
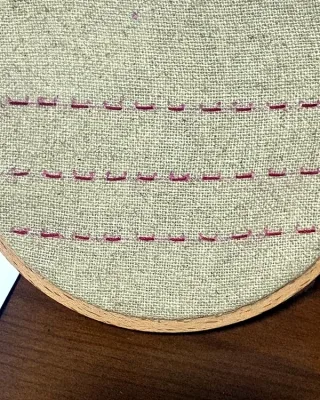
If the spacing varies, check whether the needle went through the centers of the marked dots. If a loop stands above the cloth, ease the slack toward the loose end. If the cloth ripples along the stitch line, loosen or undo the tight stitches and resew with a lighter pull. If the weave also looks crooked away from the stitches, loosen the hoop and straighten the fabric before tightening it again. Check again with the scrap flat before trimming.
Secure the ends and try a curve
Secure both thread ends
Keep the needle on thread B and make two tiny stitches through the fabric beneath the last running stitch. Hide them under the existing stitch. Thread tail A through the needle and secure it the same way beneath the first stitch. Check the front: both ends should lie flat. Then trim the excess thread close to the holding stitches. Use this finish for your practice scrap.
Sources: Royal School of Needlework · Finishing stitch
Practice on a curve
Trace the same curve twice on the scrap. You can use the edge of a small lid. Start both rows at the same end with the same thread. On the first curve, keep the stitch and gap lengths from your straight row. On the second, mark the holes closer together along the bend. Shorten the distance from where the needle comes up to where it goes down, and from there to where it comes up again. You'll make more stitches along the same stretch of line.
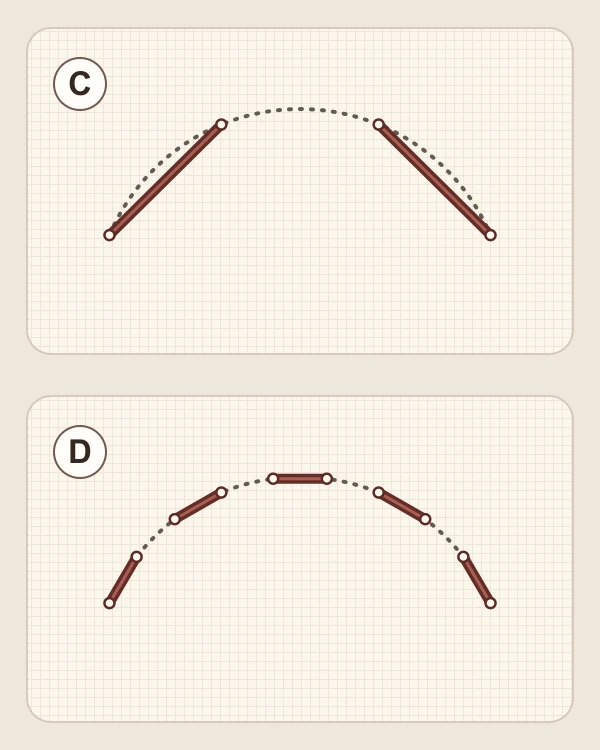
Take the cloth out of the hoop and lay it flat. If a hole sits off the drawn line, undo the affected stitches and sew them again with both needle holes on the line.
If both holes are on the line and the thread still cuts across the inside of the curve, undo that stitch and sew a shorter one: insert the needle closer to where it came up. Leave a shorter gap before bringing the needle up for the next stitch.
Secure the ends when the row follows the curve, the gaps are still visible, and the cloth lies flat. For a continuous outline, use backstitch to join the ends of adjacent stitches.
Sources: Royal School of Needlework · Running stitch · Royal School of Needlework · Back stitch
Continue reading
References
Royal School of Needlework · Running stitch
DMC · Preparing fabric for embroidery
Royal School of Needlework · Finishing stitch