

What Tools Do You Need for a First Lacquer Project?
Choose a lacquer brush, spatula, and abrasive by the surface and stage of a first practice panel.
By BeenEast Editorial · Published · Reviewed
Choose a brush for a prepared panel
For a first brushed-lacquer sample on a prepared wooden panel, begin with one lacquer brush, a small mixing spatula and palette, a stable support, and access to a curing enclosure. Add an abrasive when the lesson reaches leveling. A panel with its foundation already prepared lets you concentrate on spreading a thin coat. This guide uses that supervised exercise to explain which tools to choose and when to add them.
Urushi, the Japanese name for tree-sap lacquer, is applied with a dedicated lacquer brush. Traditional brushes can have human-hair bristles held inside a wooden body. In the Wajima workshop documented below, lacquerer Tomio Sakashita values the hair’s combination of softness and strength. Brush width and exposed bristle length vary with the work and the maker’s handling.
Sources: Japan Artisan Foundation — Uwa-nuri, with lacquerer Tomio Sakashita
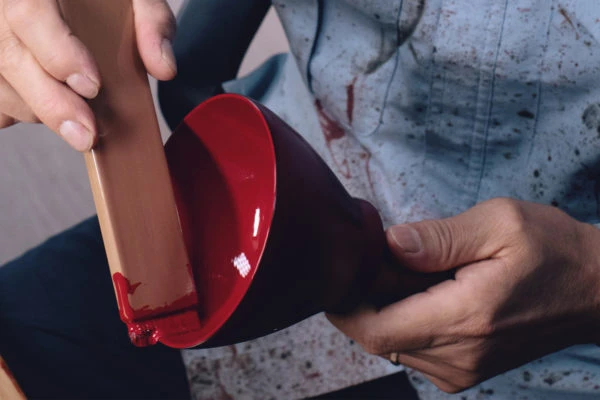
For a flat panel, choose a brush whose working edge fits comfortably across the area you can coat in one controlled pass. A wider brush covers more of an open face. A narrower one gives access to a small area or edge. The panel size and technique determine the useful width. The bowl photo shows why the shape matters too—the bristles meet a curved wall while the other hand turns and supports the vessel.
Keep the brush’s purpose tied to the finish. For wiped lacquer, raw urushi is spread onto wood and the excess is wiped away before it hardens. That exercise needs suitable wiping material as well as an applicator. It develops a different skill from leaving an even brushed coat on a prepared ground.
Sources: Japan Kogei Association — Urushi application and finishing techniques
Match the spatula edge to its job
A spatula handles lacquer on the palette and spreads the thicker mixtures used in a foundation, the preparatory layer beneath the finish. Yao Urushi Kougei describes cypress spatulas for paste-like lacquer mixtures. A small mixing spatula is useful at the palette even when your panel’s foundation has already been made.
Sources: Yao Urushi Kougei — Tools and materials
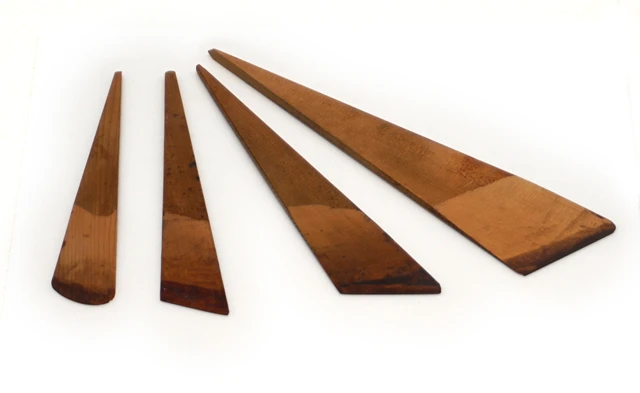
For a flat panel, a straight spatula edge contacts a strip of the face as you draw the foundation mixture across it. The blade’s width determines how much of that area it can reach in one pass. Inside a bowl, a straight edge cannot follow the curved wall in the same way. The Wajima museum documents a rounded spatula for spreading the foundation there. Match the edge to the surface you will actually cover.
Sources: Wajima Museum of Urushi Art — Tools B10, B13, B15, B16 and techniques A17, A26
Before buying several shapes, try the studio’s sample tools with the actual material. Check whether the edge reaches the area you need, whether it feels controllable in your hand, and whether it leaves a continuous spread. Treat this as a handling comparison. A photograph can show the profile, but the flexibility and condition of the edge need a physical check. A foundation-spreading blade becomes necessary when you begin that stage. The prepared-panel exercise can start with the smaller palette tool.
Choose an abrasive for the layer
An abrasive removes material from a hardened surface. Its job changes with the stage. Yao Urushi Kougei uses whetstones to work the base and undercoat, and polishing charcoal for finer work before top coating and during a mirror finish. This makes “a polishing tool” too broad a description for a first purchase.
Sources: Yao Urushi Kougei — Tools and materials
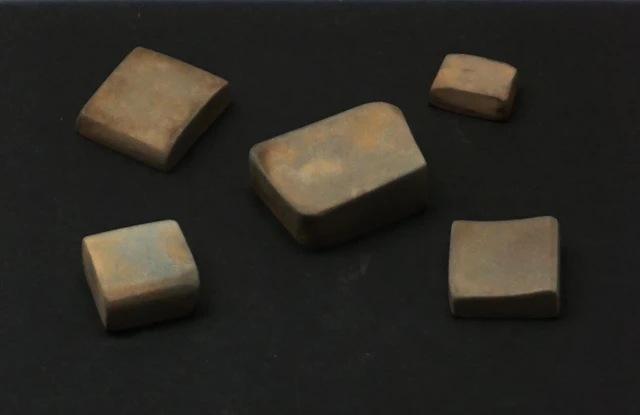
For a first panel lesson, choose the abrasive for the specific layer you will level. Its grade and wet or dry method need to suit the foundation, coating thickness, and intended finish. Confirm those details with the studio before buying a supply. The shapes in the photograph help identify the tools, but their grades cannot be read from appearance.
Leveling between coats and polishing a finished surface serve different purposes. In the Wajima museum’s intermediate-coat example, a fine whetstone or polishing charcoal works the hardened coating before the next coat. A final coat may instead be left with its brushed finish. Buy final-polishing equipment only when that operation is part of the finish you are learning.
Sources: Wajima Museum of Urushi Art — Tools B10, B13, B15, B16 and techniques A17, A26 · Japan Kogei Association — Urushi application and finishing techniques
A Shanghai workshop shows how specific that starting point can be. In August 2026, the Shanghai Art & Design Academy offered hand grinding of lacquer boxes inlaid with mother-of-pearl, the iridescent inner layer of shell, during an exhibition at the Liu Haisu Art Museum’s branch venue. The documented exercise began with an inlaid box. It was a different task from brushing a first coat onto a prepared panel. The event report does not identify abrasive grades, so the Japanese tool examples above illustrate general forms rather than that workshop’s equipment.
Sources: Shanghai Putuo District Government — Lacquer exhibition and hands-on workshop, August 17, 2026
Arrange the support and curing space
For the panel exercise, arrange a dedicated palette for the small amount of lacquer in use, a resting place for the brush, and a support that lets you reach the intended face without touching the wet coating. A flat, nonabsorbent surface such as a suitable glass plate or tile is a practical palette option for this sample. Keep these items dedicated to the workshop’s materials.
Urushi needs controlled humidity and temperature while it hardens. The curing enclosure is part of the setup from the first coat. A thermometer and humidity meter make those conditions observable, but a box and a meter alone do not establish a working curing system. Use the studio’s established enclosure and the conditions specified for its lacquer.
Sources: Japan Ministry of Foreign Affairs — The World of Japanese Lacquer
For a first class, confirm that the prepared panel, lacquer, curing space, material-specific protection, and brush-cleaning supplies are included. If they are provided, you can choose your personal brush and palette spatula after trying the studio’s tools. Add a foundation blade or a particular abrasive when you begin that operation.
At this first panel, the small spatula handles lacquer on the palette and the brush spreads it across the prepared face. The coated panel then needs its support and curing space. An abrasive enters the sequence only after the layer has hardened and the next operation calls for leveling.
Continue reading
References
Wajima Museum of Urushi Art — Tools B10, B13, B15, B16 and techniques A17, A26
Yao Urushi Kougei — Tools and materials
Japan Artisan Foundation — Uwa-nuri, with lacquerer Tomio Sakashita
Japan Kogei Association — Urushi application and finishing techniques
Japan Ministry of Foreign Affairs — The World of Japanese Lacquer
Shanghai Putuo District Government — Lacquer exhibition and hands-on workshop, August 17, 2026