

What Is Sashiko Embroidery? How to Stitch a First Sample
Learn how sashiko uses running stitches and spacing to reinforce cloth and draw patterns, then practice a simple crossing on a cotton scrap.
By BeenEast Editorial · Published · Reviewed
What makes sashiko distinctive?
Sashiko is a Japanese stitching tradition built around the running stitch. The needle passes in and out of the cloth, leaving a line of short dashes on the front. Repeated stitches can bind layers of cloth for reinforcement. The same dashes and the spaces between them can draw a pattern across a garment.
Sources: The Met · Sashiko Jacket (67.172.1) · Royal School of Needlework · Running stitch
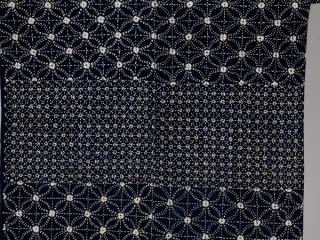
In the jacket detail below, white stitches form linked circles on indigo-dyed cotton. The Met calls the design shippō-tsunagi. Follow one curved line through the repeat and notice that the visible dashes guide your eye across the spaces between them.
Sources: The Met · Sashiko Jacket (67.172.1)
Compare with stitched resist dyeing in Dali, China
In Zhoucheng, in Dali, Yunnan, Bai makers use stitches to gather cloth before dyeing. They sew along a marked design and pull the thread tight. The folds limit where dye can reach. After dyeing and drying, the makers take out the gathering thread, revealing pale marks in the cloth.
Sources: China Intangible Cultural Heritage Digital Museum · Bai tie-dye in Zhoucheng, Dali
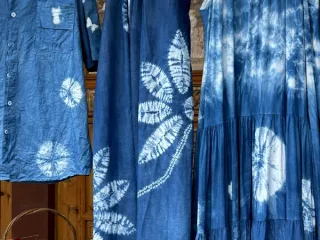
Follow the pale leaf shapes on the center garment, then look back at the Japanese jacket. In the Bai example, the dye and the pale areas make the design after the gathering thread comes out. In the sashiko jacket, the white thread stays in the cloth and draws the pattern. For the practice row below, pull only until the thread lies against the surface so the cloth stays flat.
Sources: China Intangible Cultural Heritage Digital Museum · Bai tie-dye in Zhoucheng, Dali · The Met · Sashiko Jacket (67.172.1)
Make a row on a cotton scrap
Start with a small piece of medium-weight woven cotton, a sharp needle with an eye large enough for your cotton thread, and a fabric marker tested on the same cloth. Choose a thread that stands out. For this exercise, use one layer so you can flip it over to see both sides. Draw one straight line and mark four evenly spaced points from left to right.
Sources: Hobbyra Hobbyre · How to Do Sashiko, pp. 1–2
Hold a thread tail against the back. Bring the needle up at 1 and down at 2, then up at 3 and down at 4. Pull gently until the two dashes rest on the front. Flip the cloth over to find the thread between points 2 and 3. That span is what leaves the gap on the front. Keep working to the right until you have a short row.
Sources: Royal School of Needlework · Running stitch
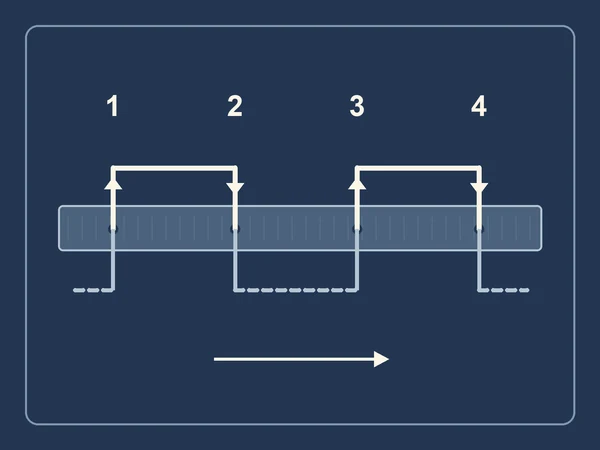
The drawing lifts the thread above and below the cloth so its path is easier to see. In the sample, the thread should rest against the cloth on both sides. Smooth the fabric with your fingers as you go. When you finish the row, secure the tails on the back by passing them under a few stitches and checking that a gentle tug does not loosen the row.
Sources: Hobbyra Hobbyre · How to Do Sashiko, pp. 1–2 · DMC · Securing embroidery thread
Leave an opening where two rows cross
Draw a small plus sign next to your row. Mark a gap centered on the crossing in both directions before you sew. Work the horizontal row first, then the vertical one. As you approach the center, adjust the preceding stitch slightly so the thread travels across the crossing on the back. This leaves four visible dashes around the junction.
Sources: Hobbyra Hobbyre · How to Do Sashiko, pp. 1–2
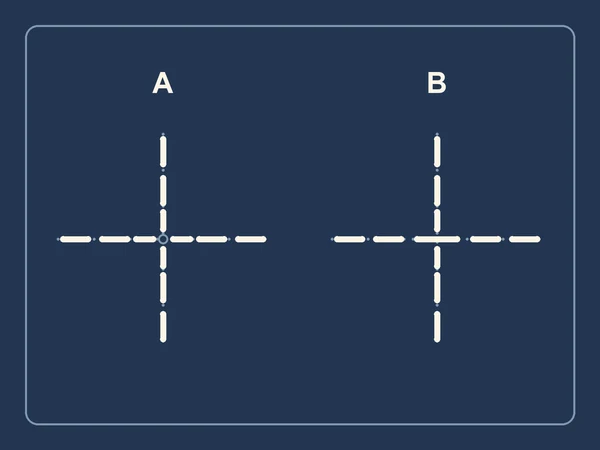
The open center in A is the goal for this sample. In B, the center is hidden by a horizontal stitch. If yours looks like B, undo just the stitch that covers the crossing and bring the needle up and down on opposite sides of the gap. If the cloth ripples, lay it flat and see whether the ripple eases when you loosen the last stitches. Practice a second cross on the same cotton. You are ready to repeat the motif when the center stays visible and the cloth lies flat.
Continue reading
References
The Met · Sashiko Jacket (67.172.1)
China Intangible Cultural Heritage Digital Museum · Bai tie-dye in Zhoucheng, Dali
Hobbyra Hobbyre · How to Do Sashiko, pp. 1–2