

How Do You Fill a Small Leaf Smoothly with Satin Stitch?
Set the angle with one straight stitch across the middle of the leaf. Lay the next stitches beside it, close enough to cover the fabric, and work toward the tip. Return to the middle and fill toward the base at the same angle.
By BeenEast Editorial · Published · Reviewed
Draw a narrow practice leaf
Satin stitch fills a shape with straight stitches that lie side by side. Each stitch crosses the shape from edge to edge, so a narrow leaf keeps the spans short while you learn to place the ends. Backstitch joins stitches end to end to make an outline. Satin stitch places them side by side to fill it.
Sources: Royal School of Needlework · Satin stitch
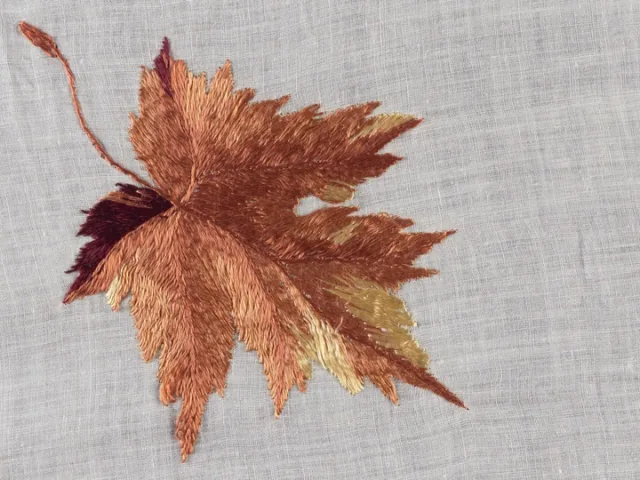
A related method in Chinese embroidery is qi zhen, also called even stitching. In her study of Qing-dynasty embroidery in the Palace Museum collection, Chen Juanjuan describes placing both ends of each straight stitch at the motif’s edge and laying the threads side by side to cover the cloth. She describes straight, crosswise, and diagonal arrangements. As you fill the small leaf below, keep the stitch direction steady and shorten each stitch where the edge curves inward.
Sources: Chen Juanjuan, The Palace Museum · Qing embroidery and qi zhen (p. 99)
Draw a leaf about 5/8 inch (16 mm) long and 1/4 inch (6 mm) wide on a scrap of smooth woven cotton. This size gives you a small area to practice on. Put the fabric in a hoop, with the tip pointing away from you and the base nearest you. Tighten the hoop until the fabric is flat and the weave still runs straight. Pull two strands of cotton floss out of the bundle one at a time, put them back together, and thread a sharp embroidery needle.
Sources: BeenEast · Embroidery supplies
You can stitch directly on the drawn edge. For a more defined edge, first outline it in split stitch using one strand of the same color. In split stitch, the needle comes up through the preceding stitch, splitting its thread to join the line. With this outline in place, bring the fill stitches up and down just outside it so the fill covers the outline.
Sources: Royal School of Needlework · Split stitch · Royal School of Needlework · Satin stitch, Method 1
Set the first two stitches across the middle
Set the angle with 1 → 2.
Come up on the left edge, near the widest part of the leaf, leaving a tail on the back to secure once you have several stitches. Hold the thread across the leaf so it angles slightly toward the tip. Take the needle down at the opposite edge. Pull until the thread rests on the cloth without drawing the two edges inward.
Return underneath from 2 to 3.
Carry the needle back under the leaf to the left edge. Come up beside point 1, a little closer to the tip.
Lay 3 → 4 beside the first stitch.
Take the needle down beside point 2, also a little closer to the tip. Both ends should advance toward the tip. The two stitches should touch along their length without one riding on top of the other.
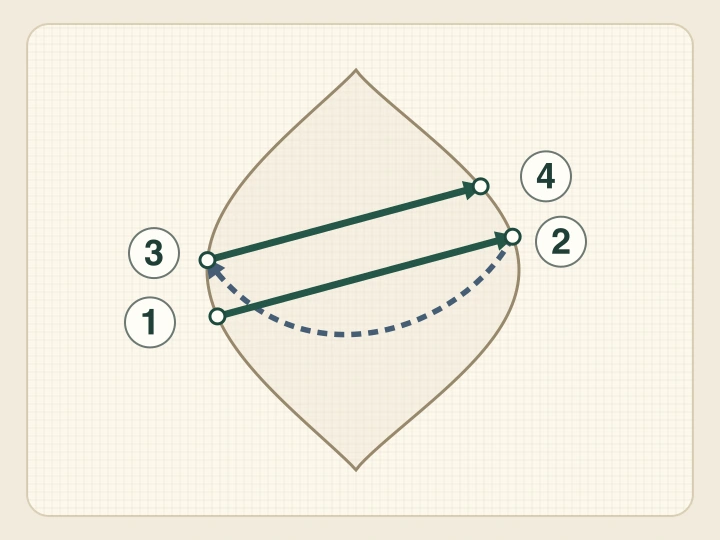
If you can see fabric between the two stitches, check both ends before adding another. A gap at only one edge tells you which end to move closer to its neighbor.
Sources: Royal School of Needlework · Satin stitch, Method 2–3
Fill toward the tip, then toward the base
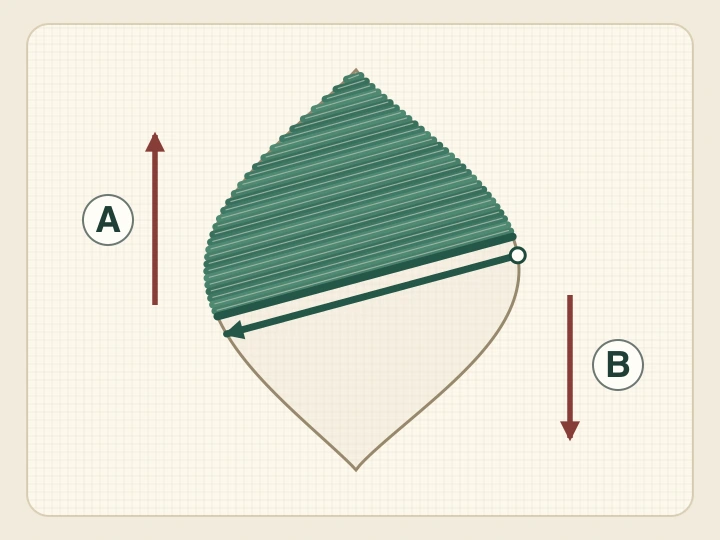
Work toward the tip, coming up on the left each time and taking the needle down on the right. Keep the slant of the first stitch as your guide. The leaf gets narrower, so the stitches get shorter. Near the tip, use the remaining sliver of bare cloth to place the last stitch. If several stitches would crowd into one hole, take out the crowded stitches and space the ends along the two edges again.
Secure the thread under a few passes on the back near the tip. With a fresh length of floss, come up on the right edge just below the first stitch and go down on the left. Continue toward the base. Your needle now crosses the front in the opposite direction, but the visible stitches still lie at the same slant. When the two groups meet at the middle, their edges should touch without making a ridge.
Sources: Royal School of Needlework · Slanted satin stitch, Method 3–5
Check the edge, gaps, and tension
Look at the leaf straight on, then tilt it under the same light. A narrow line that changes from light to dark may be the sheen of the thread. If you can see the weave of the cloth through it, you have a gap to check.
A notch along the edge
Compare that stitch’s endpoint with the edge you’re following. Undo a stitch that falls short or sticks out, then place it on the drawn curve or just outside the split stitch outline, whichever you used.
A gap or ridge inside the leaf
Follow the neighboring stitches to both edges. If their ends spread apart, bring the misplaced end closer to its neighbor. If the two strands have twisted together or a stitch sits on top of its neighbor, lift that stitch out and lay it flat again. Let the needle hang briefly to release twist.
Loose threads or puckered fabric
Loosen the hoop and lay the cloth flat. If the fabric has shifted or the weave looks skewed, reset the hoop before trying again. If the fabric draws inward at the stitch holes, try a lighter pull on a new leaf on the same cloth. If only the longest stitches lift off a flat surface, try a narrower leaf or a stitch that fills the shape in shorter lengths.
Sources: Royal School of Needlework · Slanted satin stitch · Royal School of Needlework · Long and short stitch
On a wider leaf, a drawn center vein can divide the fill into two narrower areas. Each side then spans only from the edge to the vein, and the stitch direction can differ on the two sides.
Secure the tails and check the leaf out of the hoop
Turn the work over. Thread each loose tail onto the needle and pass it under nearby stitches on the back without piercing the cloth. Give it a light tug to check that it holds. Turn the leaf over to check that the front still lies flat before trimming the excess.
Sources: Royal School of Needlework · Turned satin stitch, Method 4
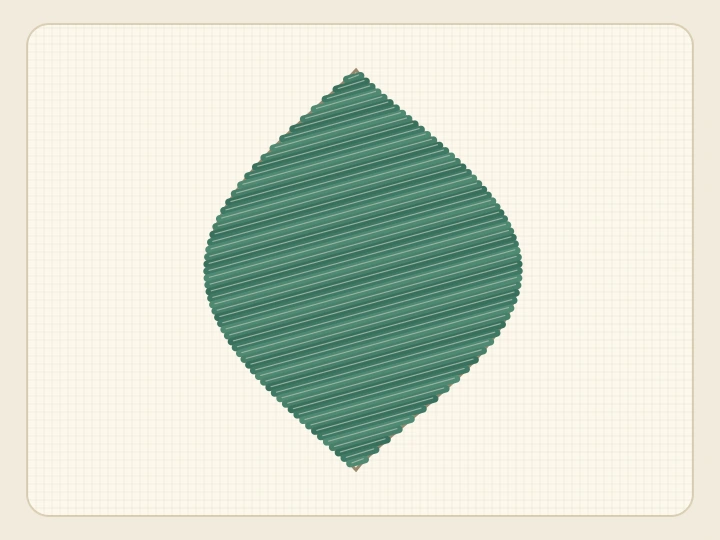
Lay your practice leaf flat after taking it out of the hoop. The cloth around it should stay flat, the outline should follow the drawn shape, and the stitches should cover the fabric from edge to edge.
Try stitching a second leaf beside a short backstitched stem, placing its base where the stem and leaf meet.
Continue reading
References
Royal School of Needlework · Satin stitch
BeenEast · Embroidery supplies
Royal School of Needlework · Split stitch
Royal School of Needlework · Satin stitch, Method 1
Royal School of Needlework · Slanted satin stitch, Method 3–5
Royal School of Needlework · Long and short stitch

Royal School of Needlework · Turned satin stitch, Method 4
Chen Juanjuan, The Palace Museum · Qing embroidery and qi zhen (p. 99)